Goto Admin System > Setting > “ your store ” Edit > Image (image tab).
tab then set logo of your site.
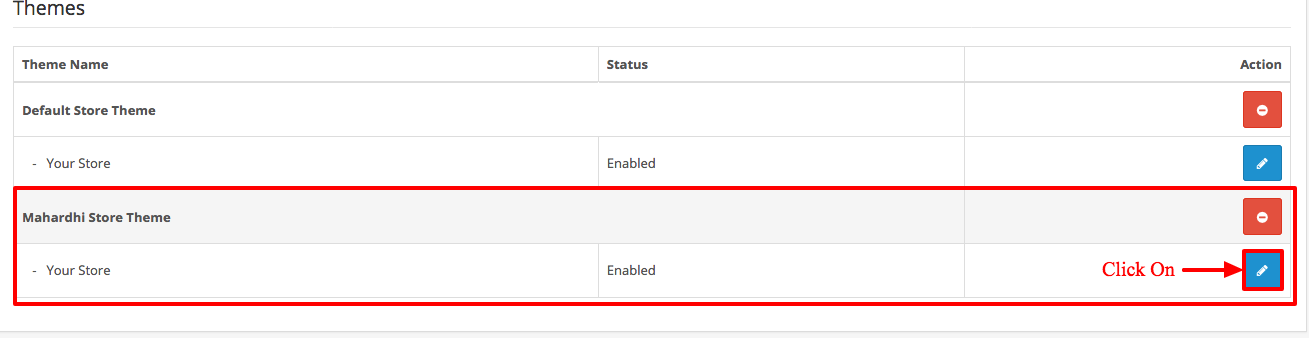
Select Store > Edit

Select Image tab
Click Save button.
![]()
This documentation will give you an understanding of how Flipmart 05 is structured and guide you in performing the most common functions
Note
Please, read the whole section, before attempting to install the theme.
it is recommend to always backup your system before making any upgrades or changes!
For installation of Opencart, you just need to follow these steps, Installation
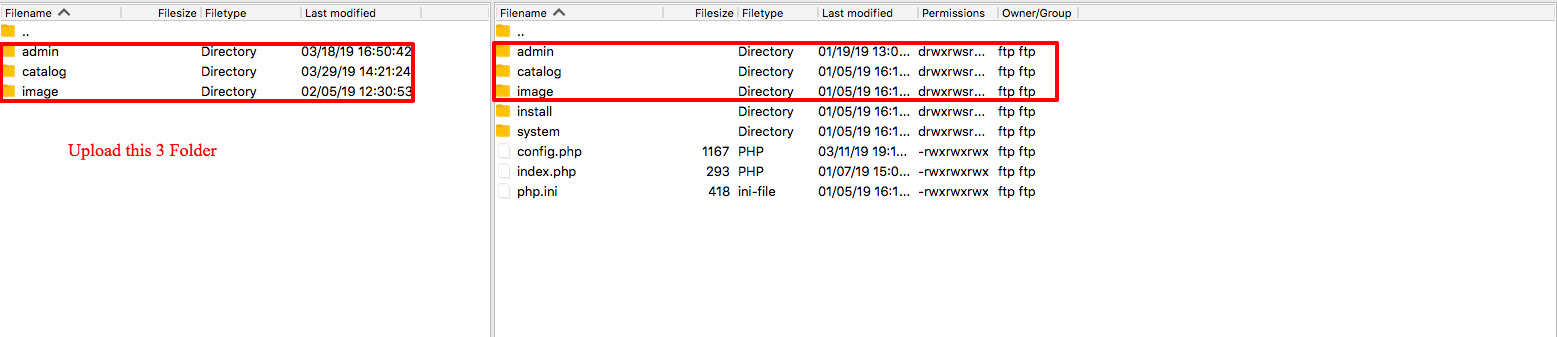
To install OpenCart template you need to upload it’s files to your hosting server
Extract the downloaded zip file and Upload all files and folders from the “Opencart Files” to your opencart root directory
"admin" (Overwrite this folder)
"catalog" (Overwrite this folder)
"image" (Overwrite this folder)
you can find this file "Sample_Data" Folder in our package
Sample_Data_05.sql -- For all theme content
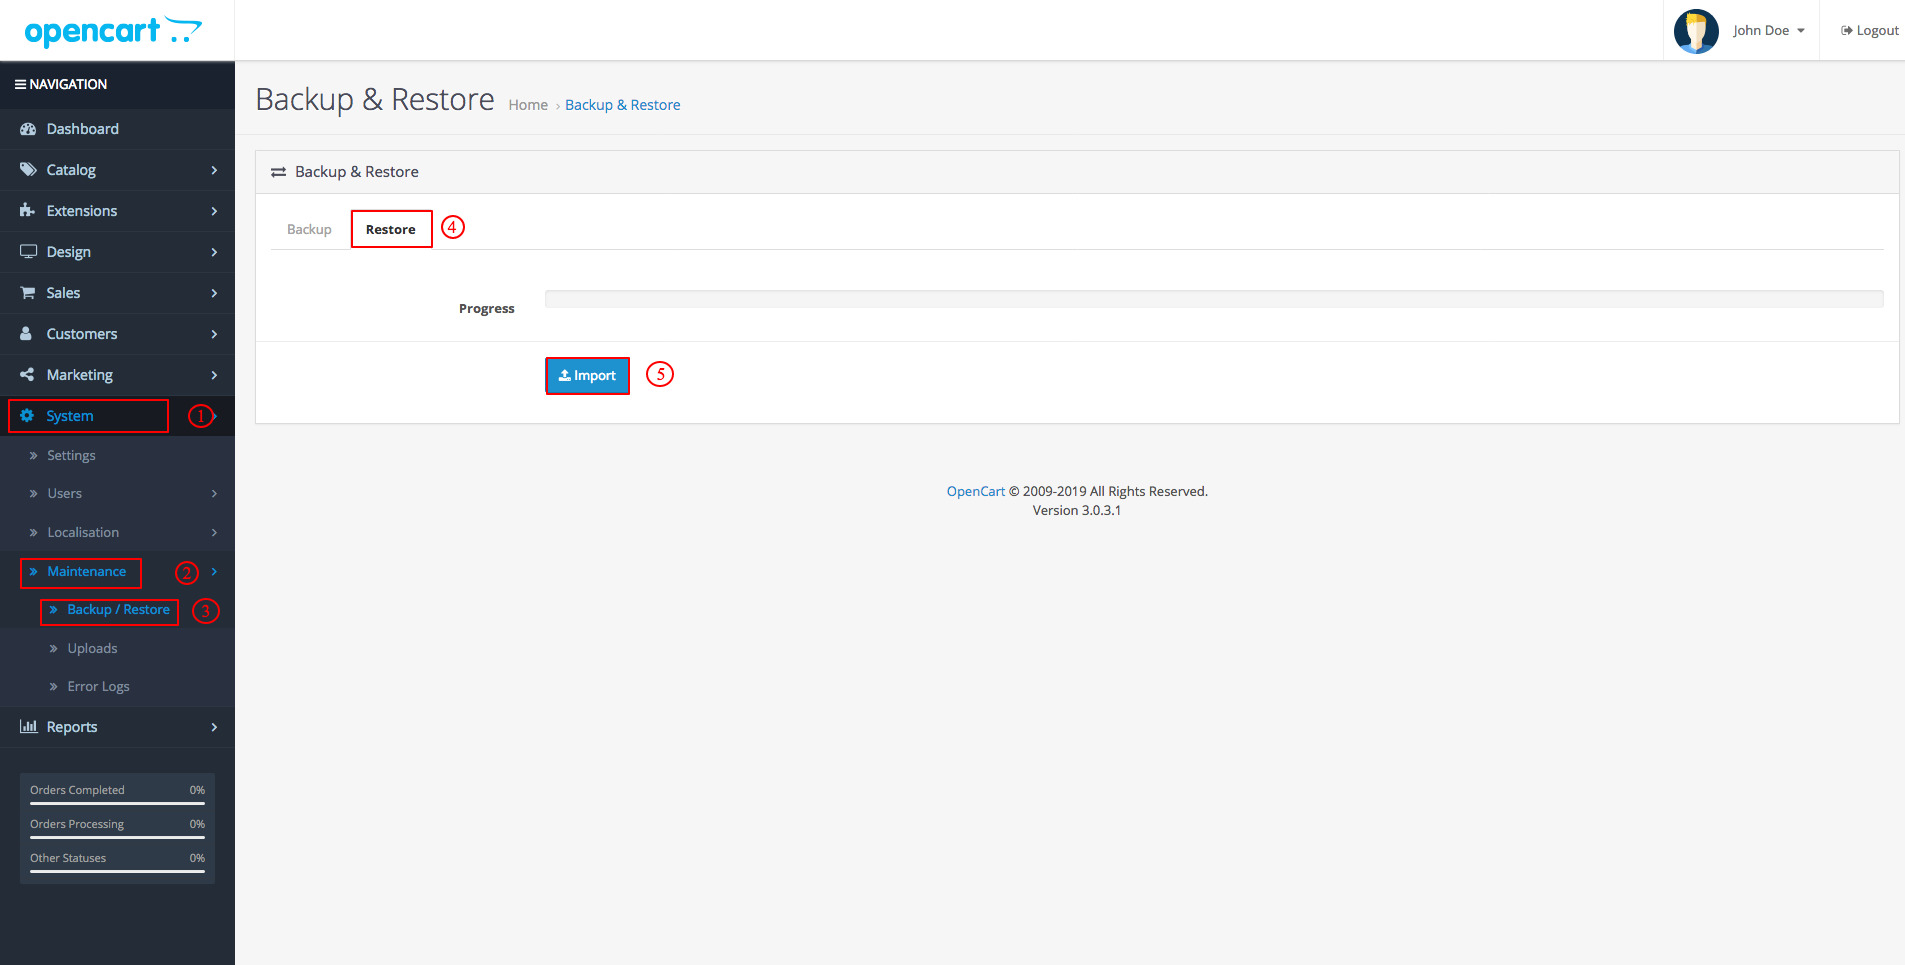
Go to Admin System → Maintenance → Backup/restore
select Restort tab click on import button and select import.sql file
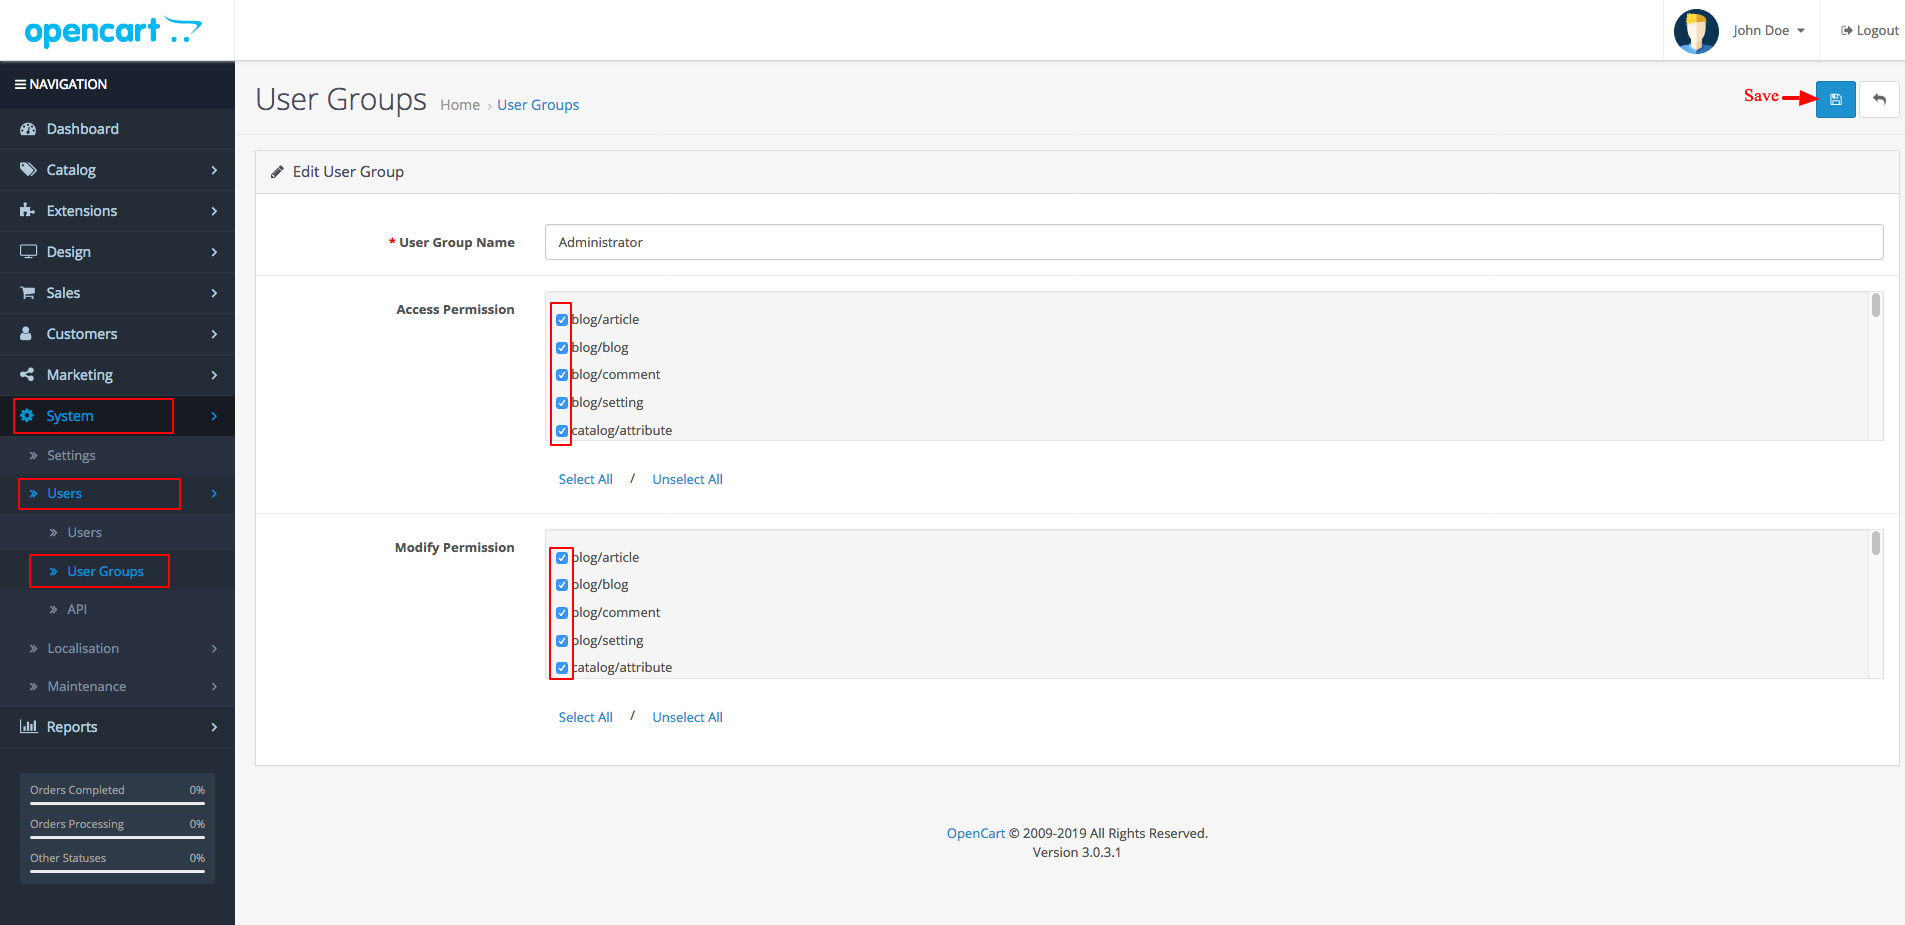
Might you display "Access Permission denied" error what you try to access Third-Party Modules,
Don't worry about it, Just need to assign administrator user-group permission.
Go to “System → Users → User Groups → Administrator → Select all access permission and modify permission”
Click on “Save” button at top right corner.
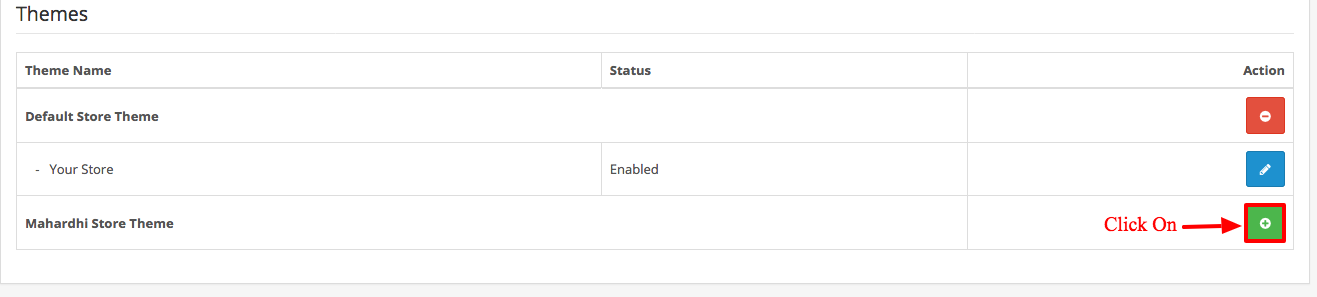
Select Your Store > Edit
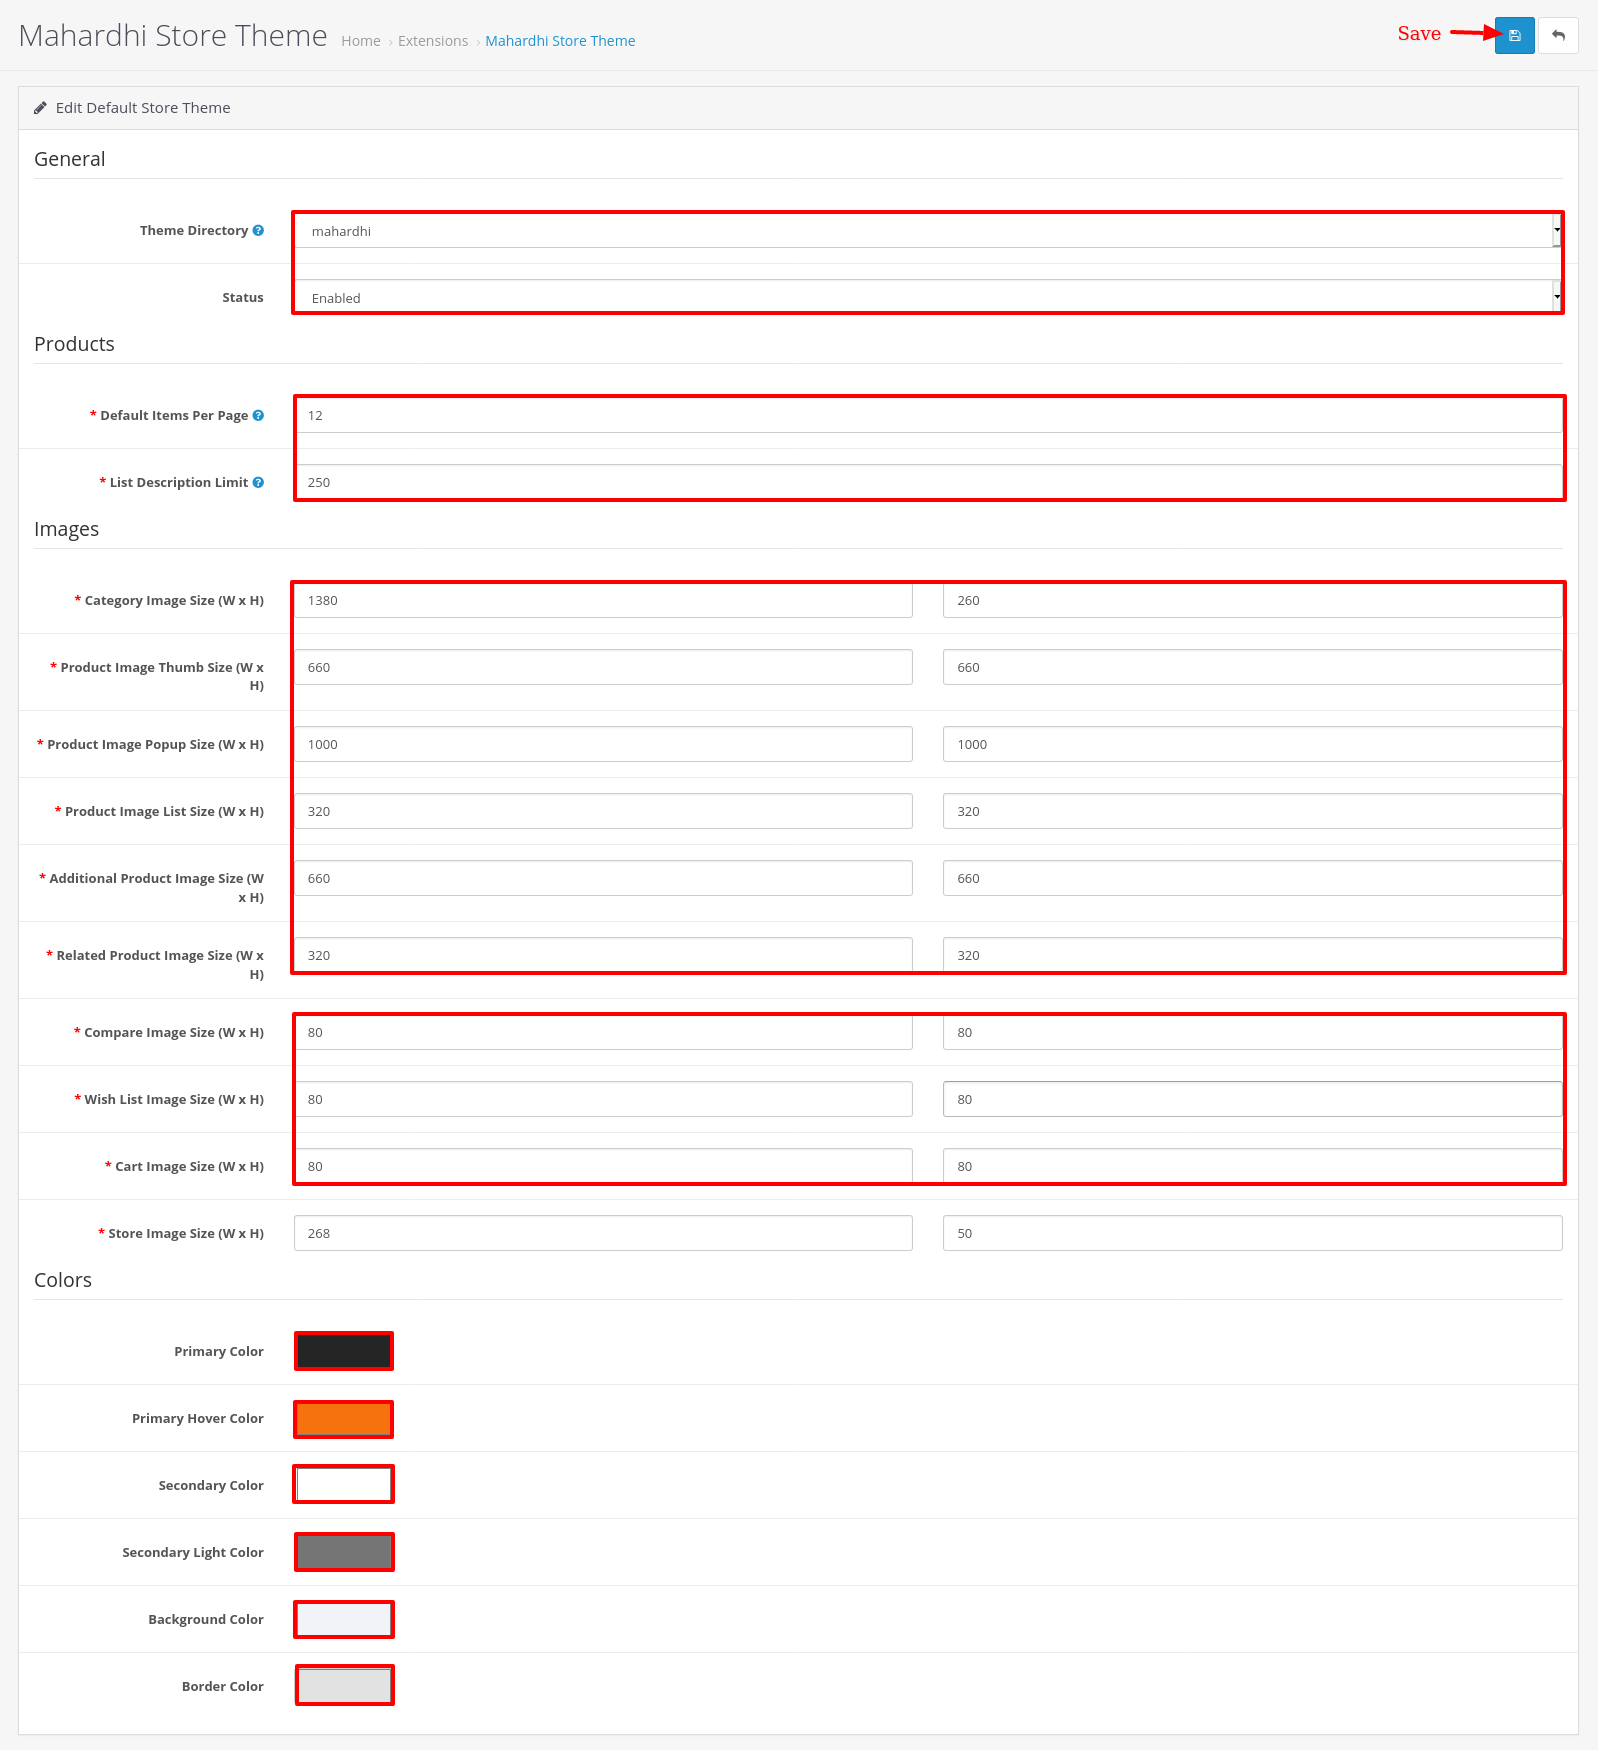
Theme Directory : (select) mahardhi
Status : Enable
Default Items Per Page : 12
List Description Limit : 250
Now Set Image Size
Category Image : 1380 X 260
Product Image Thumb : 660 X 660
Product Image Popup : 1000 X 1000
Product Image List : 320 X 320
Additional Product Image : 660 X 660
Related Product Image : 320 X 320
Compare Image Size : 80 X 80
Wishlist Image Size : 80 X 80
Cart Image Size : 80 X 80
Colors:
Primary Color : #252525 (Set Theme Primary Color)
Primary Hover Color : #F6720F (Set Theme Primary Hover Color)
Secondary Color : #ffffff (Set Theme Secondary Color)
Secondary Light Color : #757575 (Set Theme Secondary Light Color)
Background Color : #f1f3f6 (Set Theme Background Color)
Border Color : #e2e2e2 (Set Theme Border Color)
Click Save button.
Goto Admin System > Setting > “ your store ” Edit
Select General tab
Select “ Mahardhi Store Theme ” from Dropdown as shown below,
Click Save button.

Goto Admin System > Setting > “ your store ” Edit > Image (image tab).
tab then set logo of your site.
Select Store > Edit
Select Image tab
Click Save button.
![]()
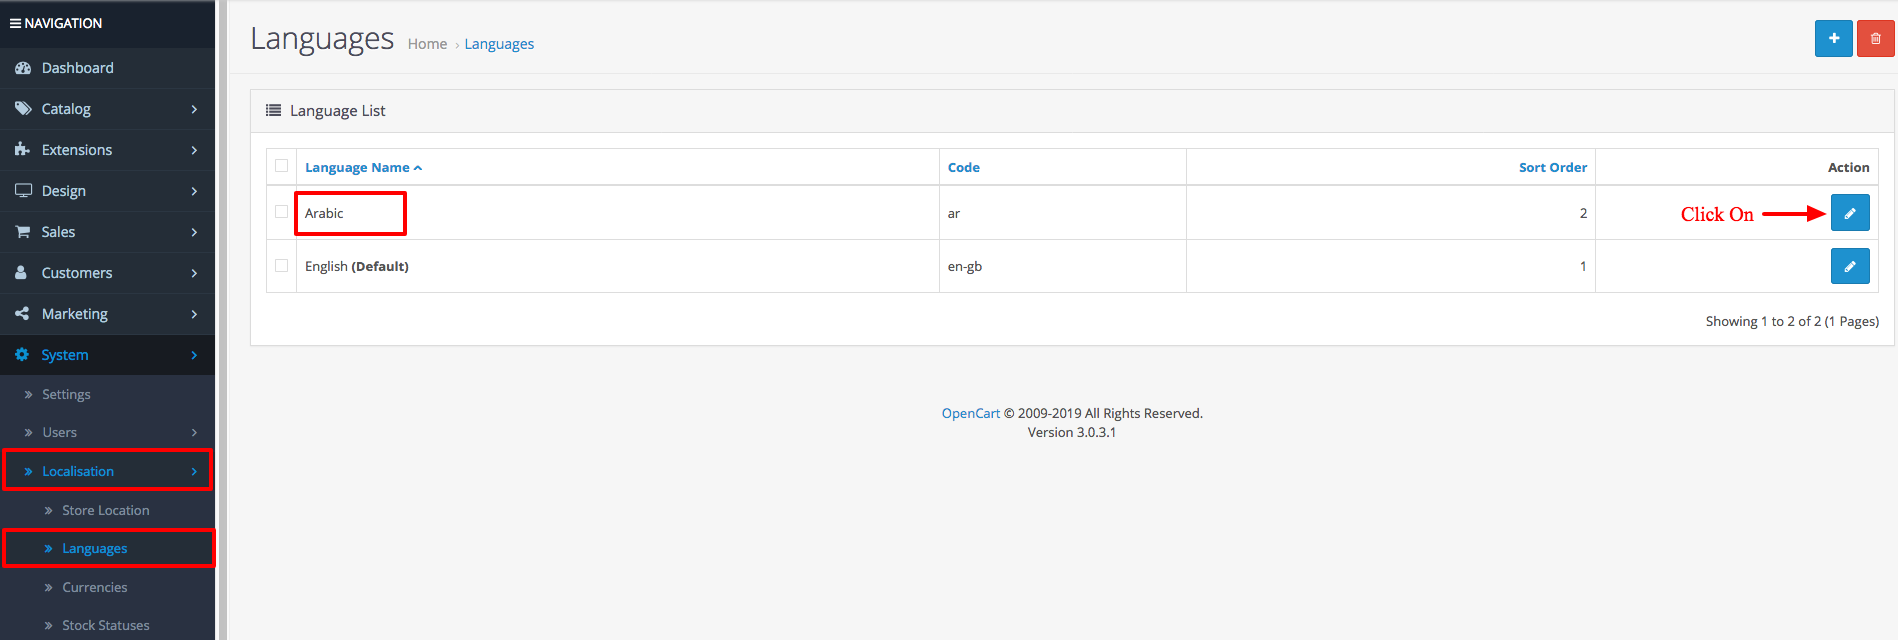
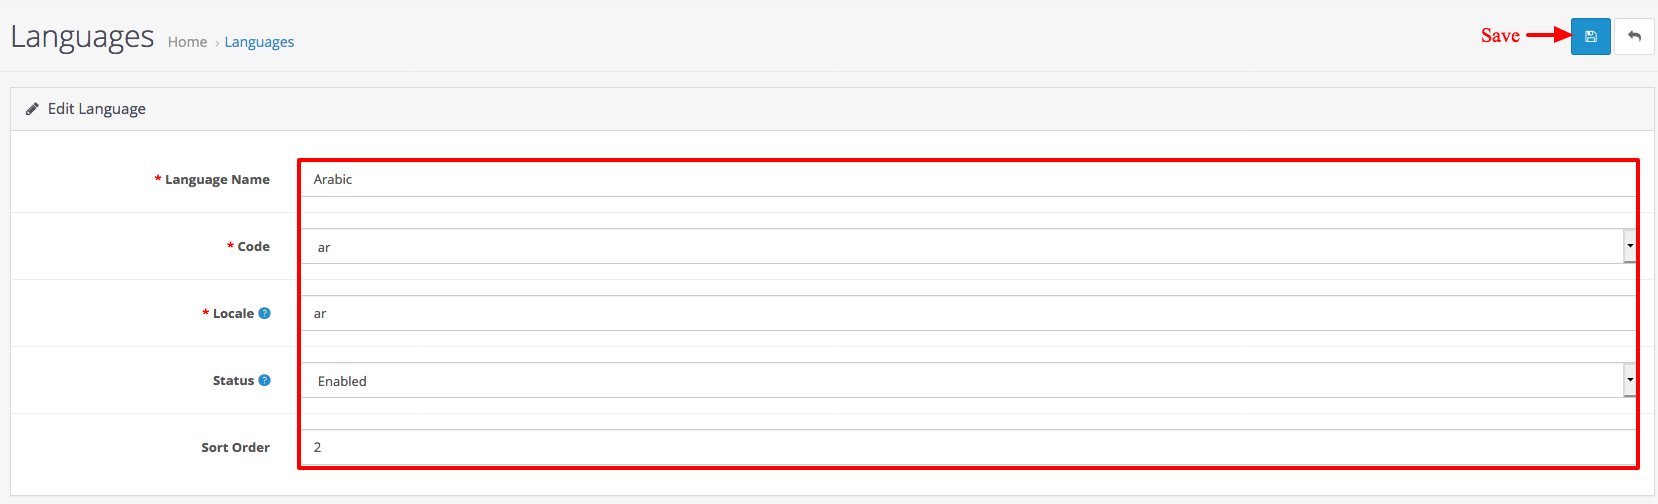
For Example To add Arbic Language :
Goto Admin System > Localisation > Languages
Add New button to add new Language
Language Name : Arbic
Code : ar
Locale : ar
Status : Enable
Sort Order : 1 or 2 as you like
Click on Save button.
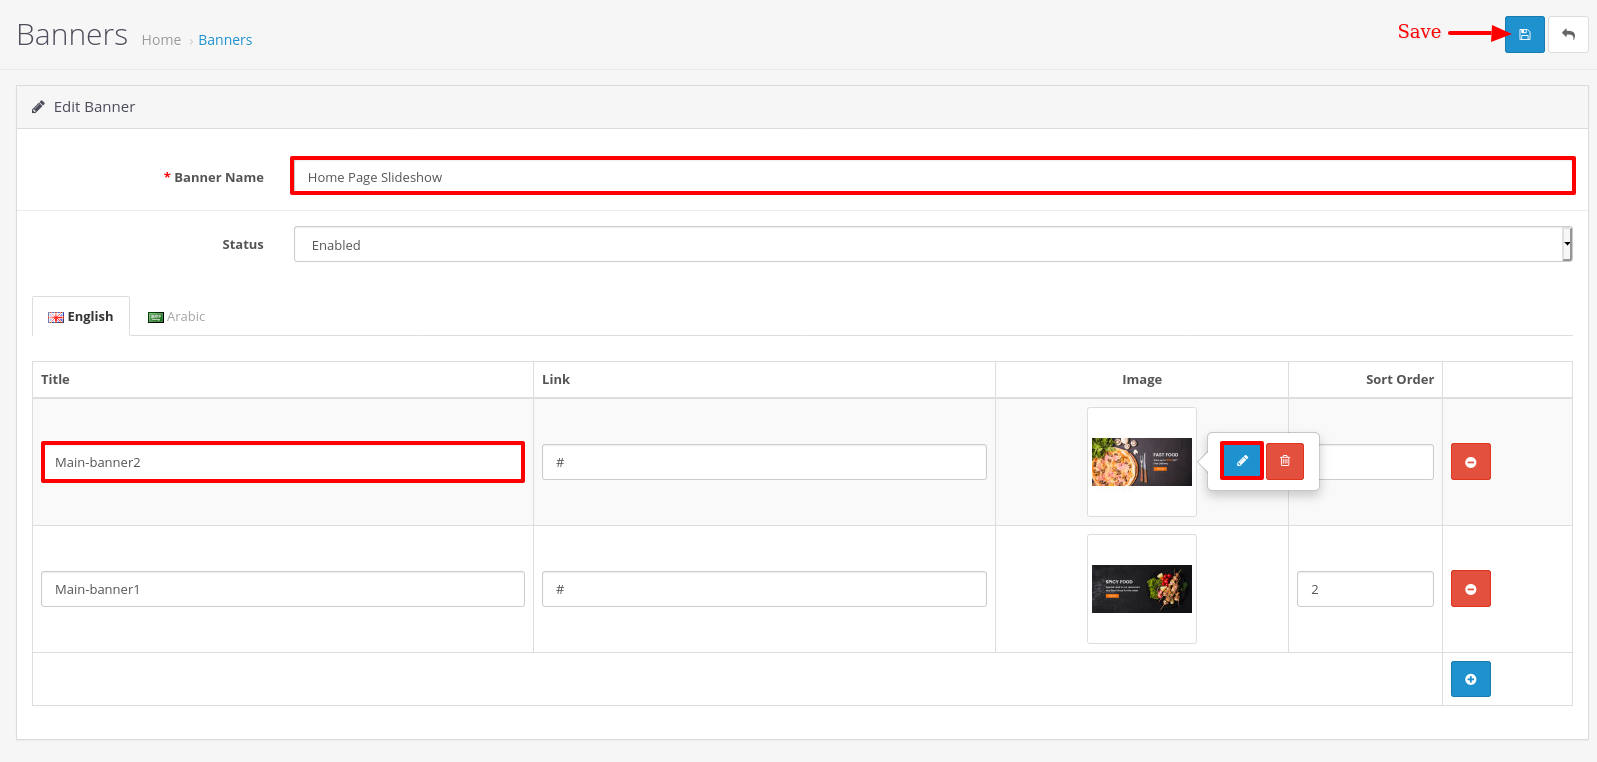
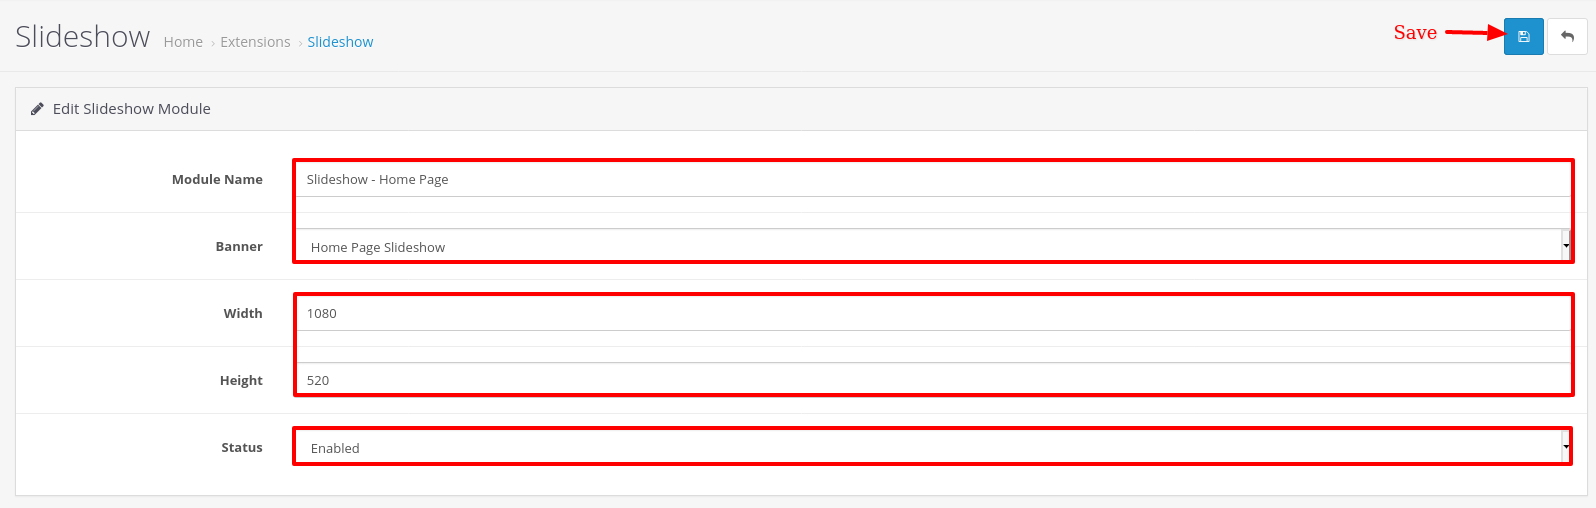
Goto Admin Design > Banners
Now ”+ Add New ” button.
Banner name : Home Page Slideshow
Status : Enabled
and then click on + Add button
set size of each image banner of your site
Give title of your banner and click on image to upload your banner
and then again click on + Add button and upload another banners
then click ”Save” button.
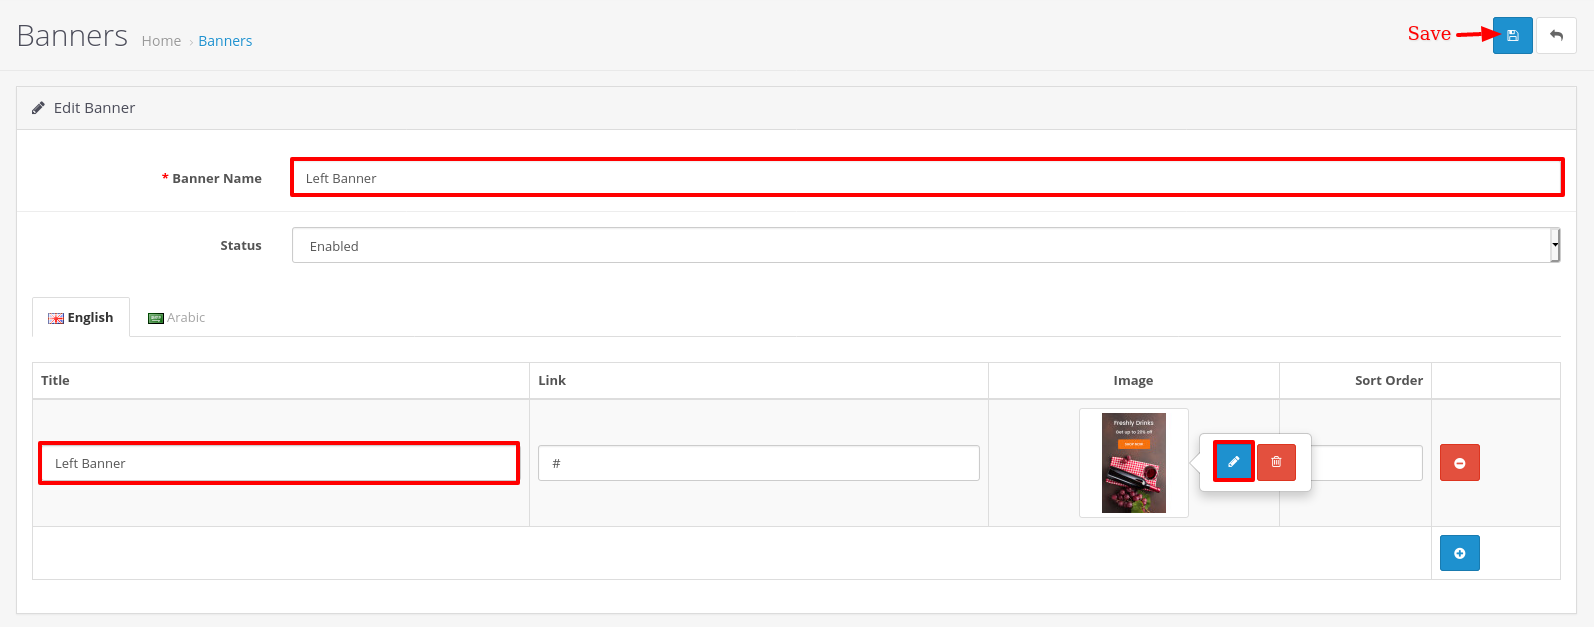
Go to Admin Design >Banners
Click on “ + Add New ” button
Banner Name : Left Banner
Status select : Enabled
and click on Add Banner button
Give title of your banner and click on image to upload your banner
and then click on ”Save” button.
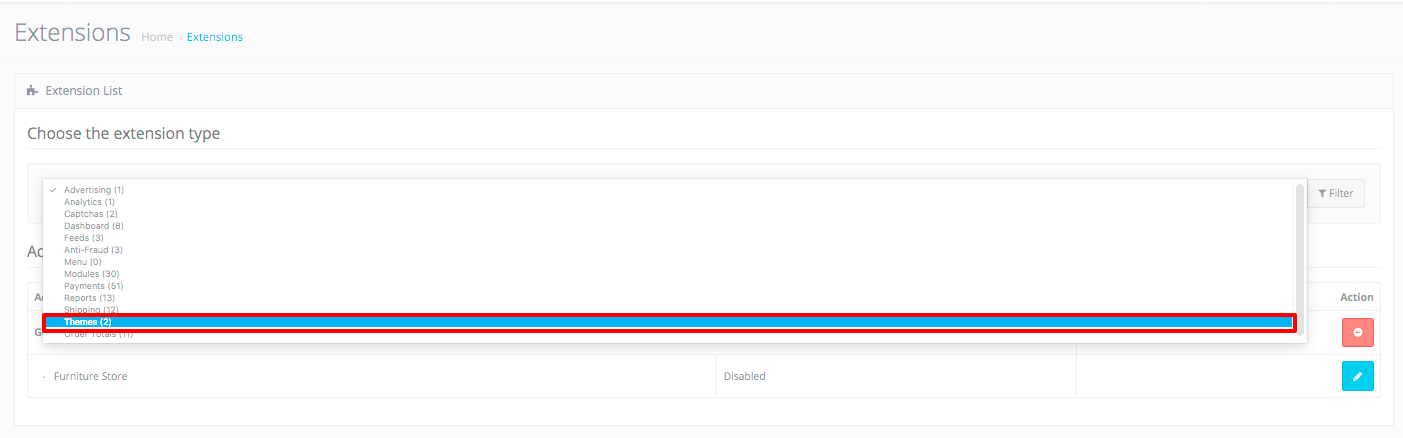
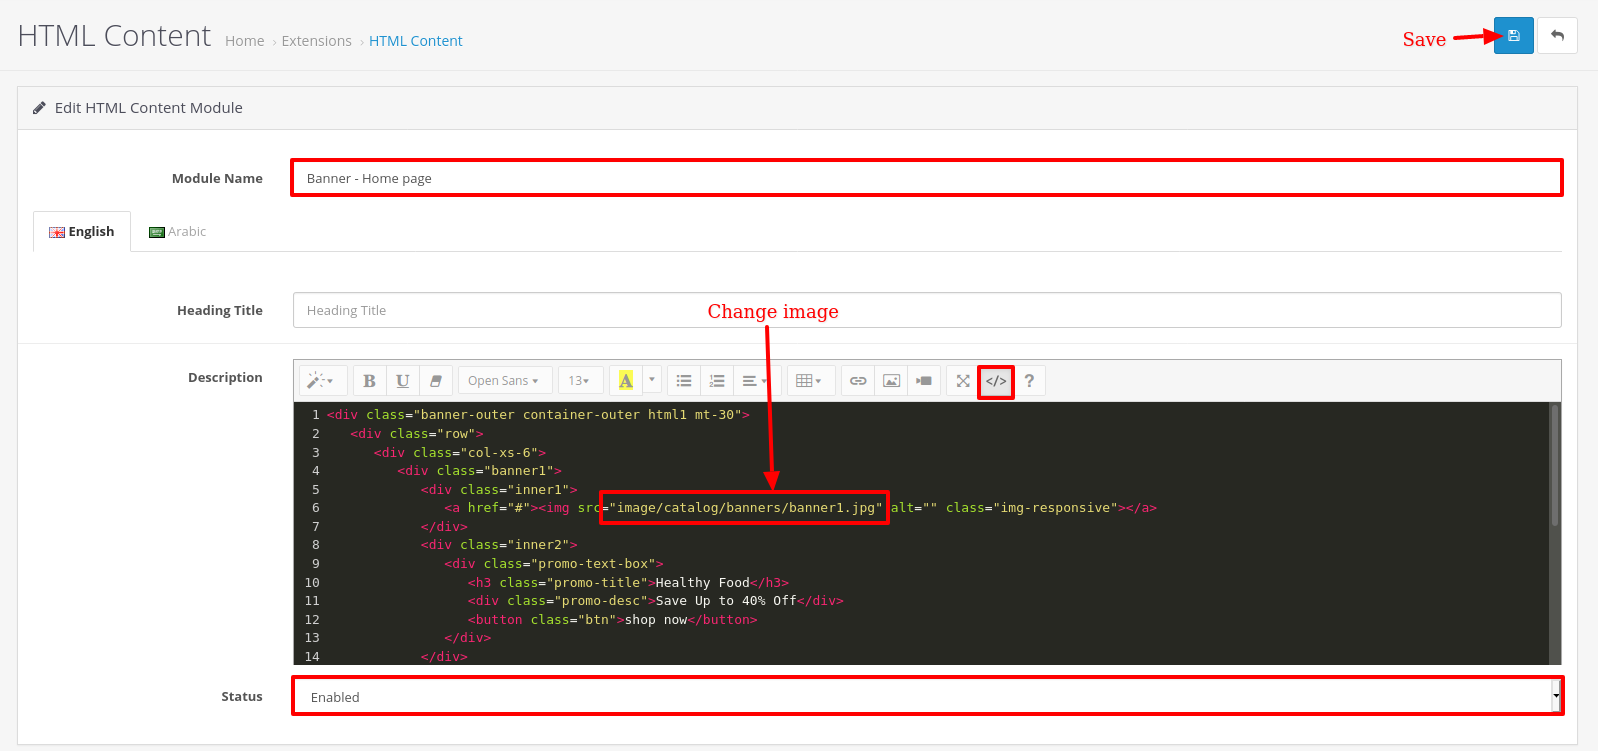
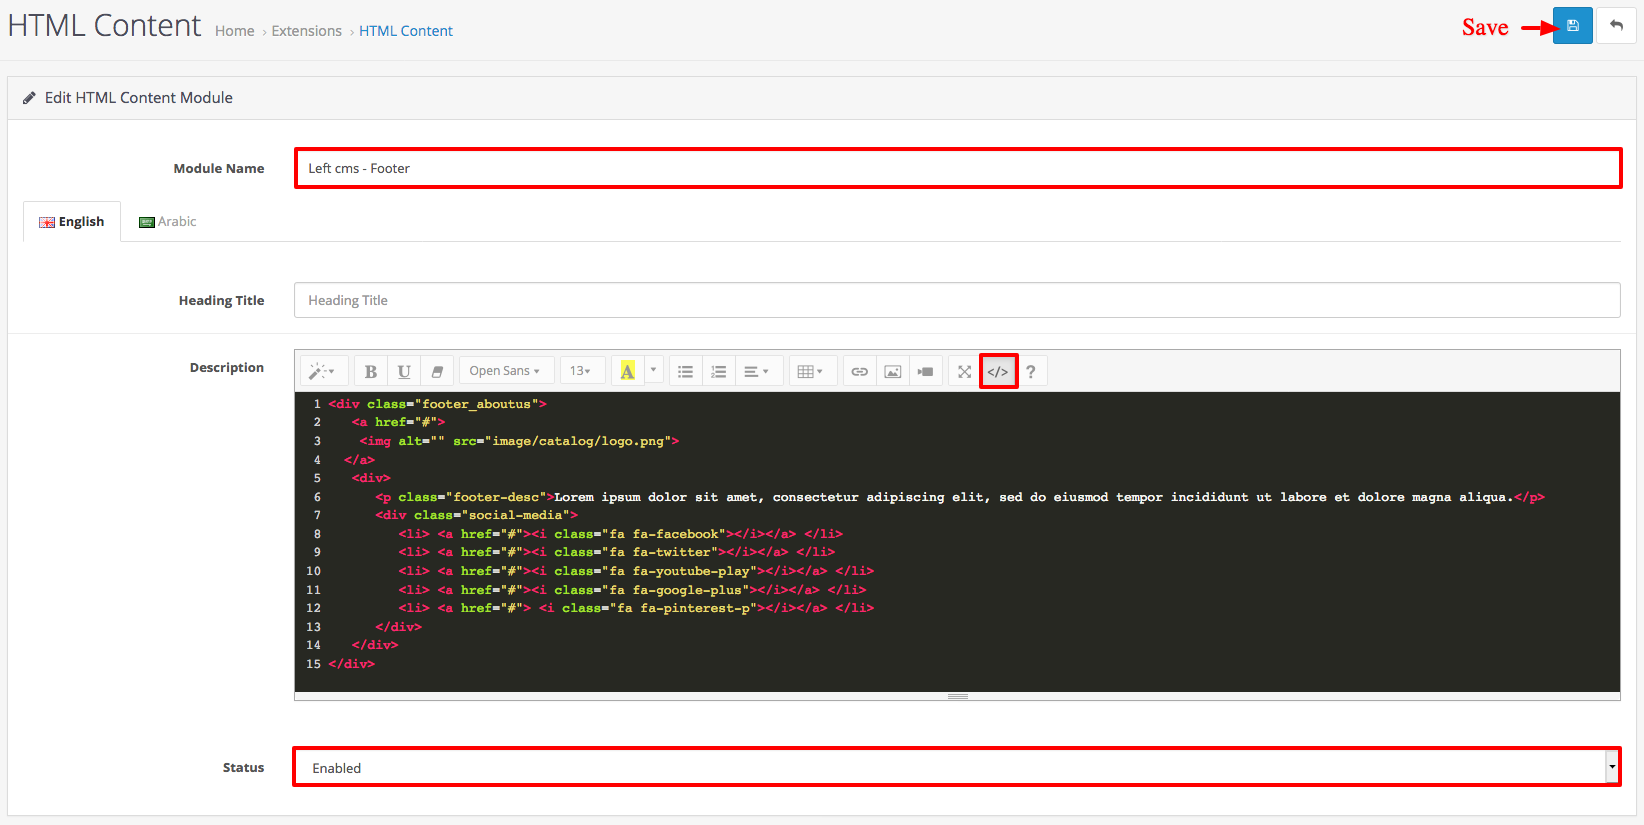
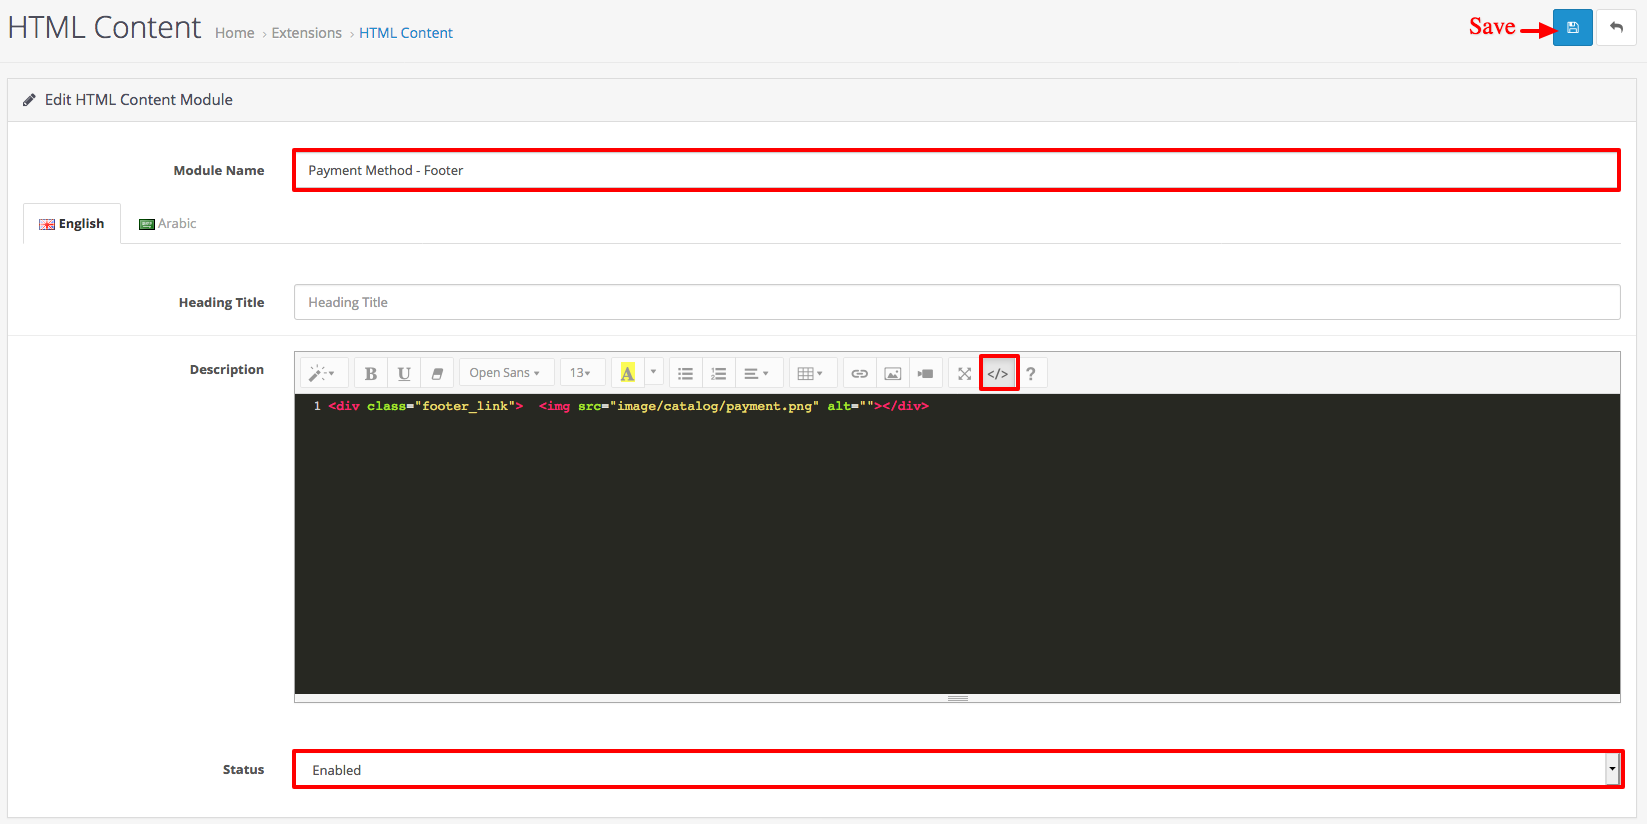
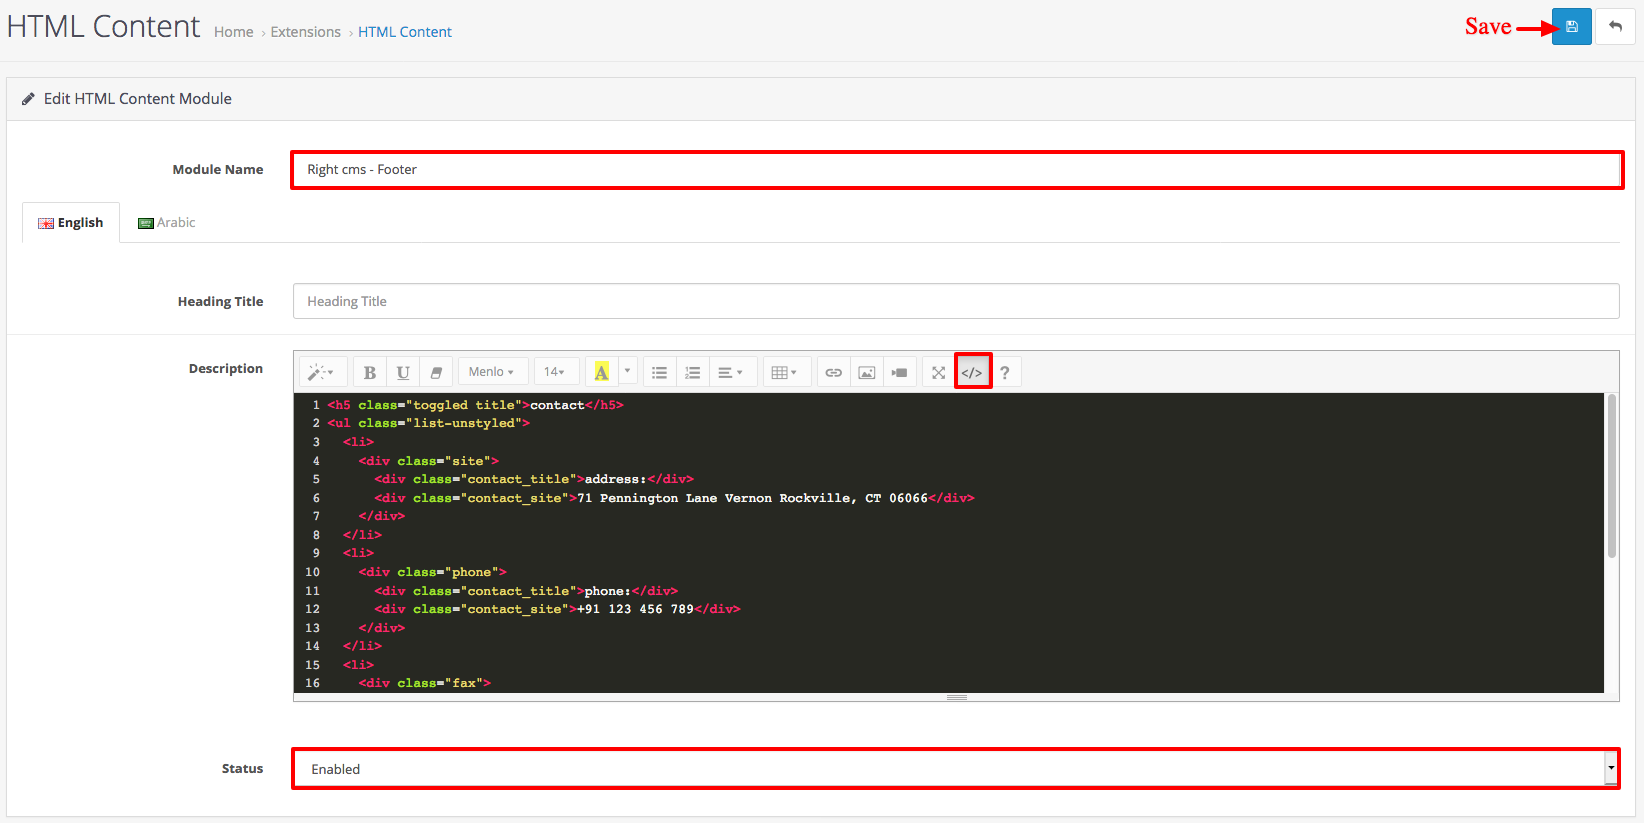
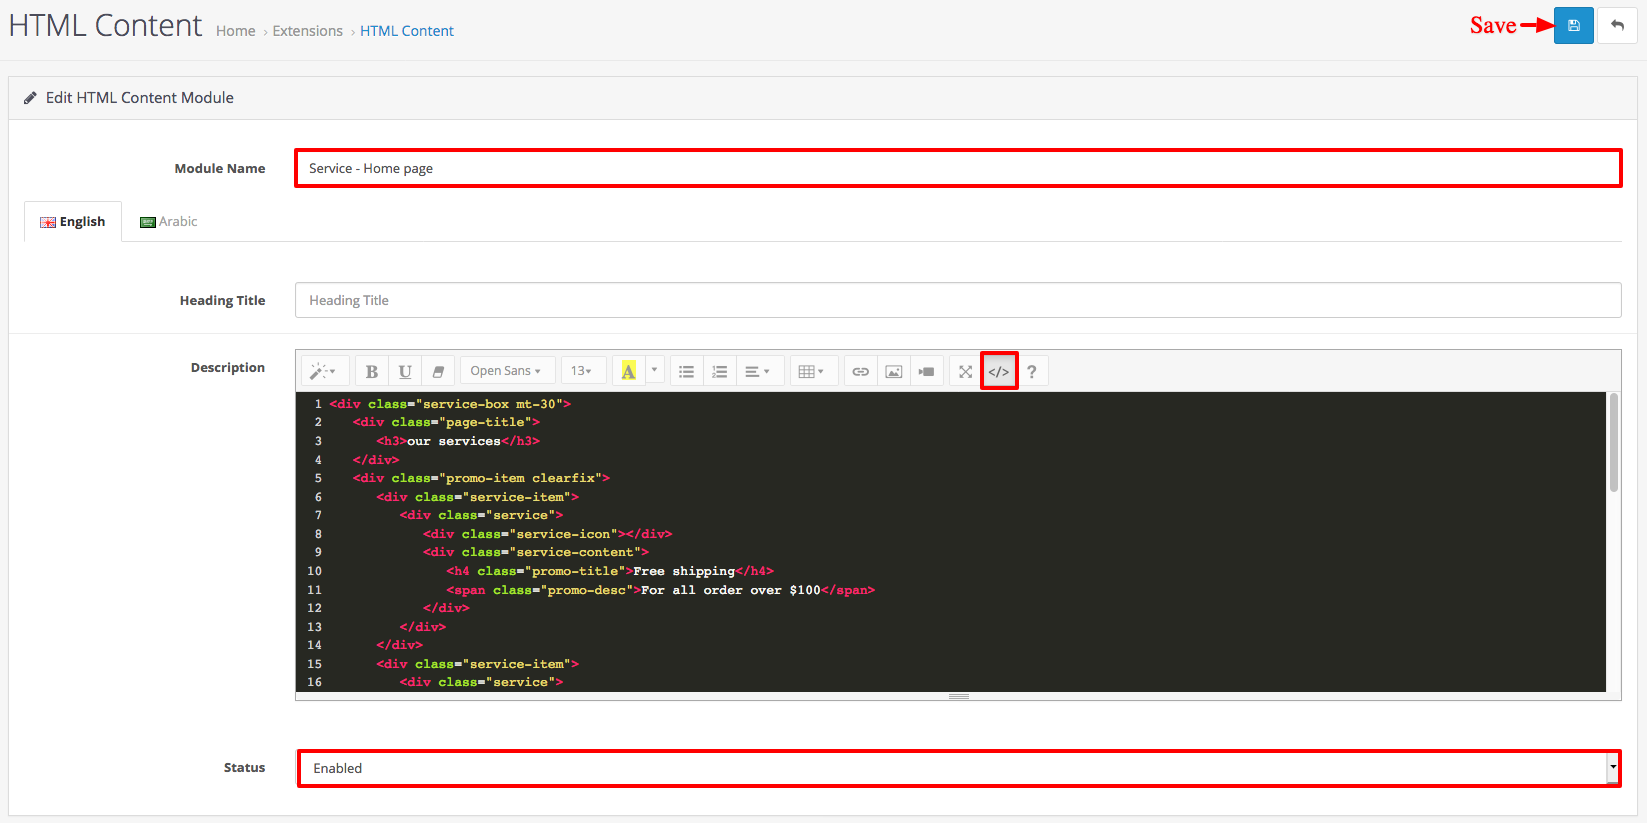
Go to Admin Extensions > Extensions. Select Modules from Dropdown.
select HTML Content > Edit ( If Edit link is not active then Click on Install link)
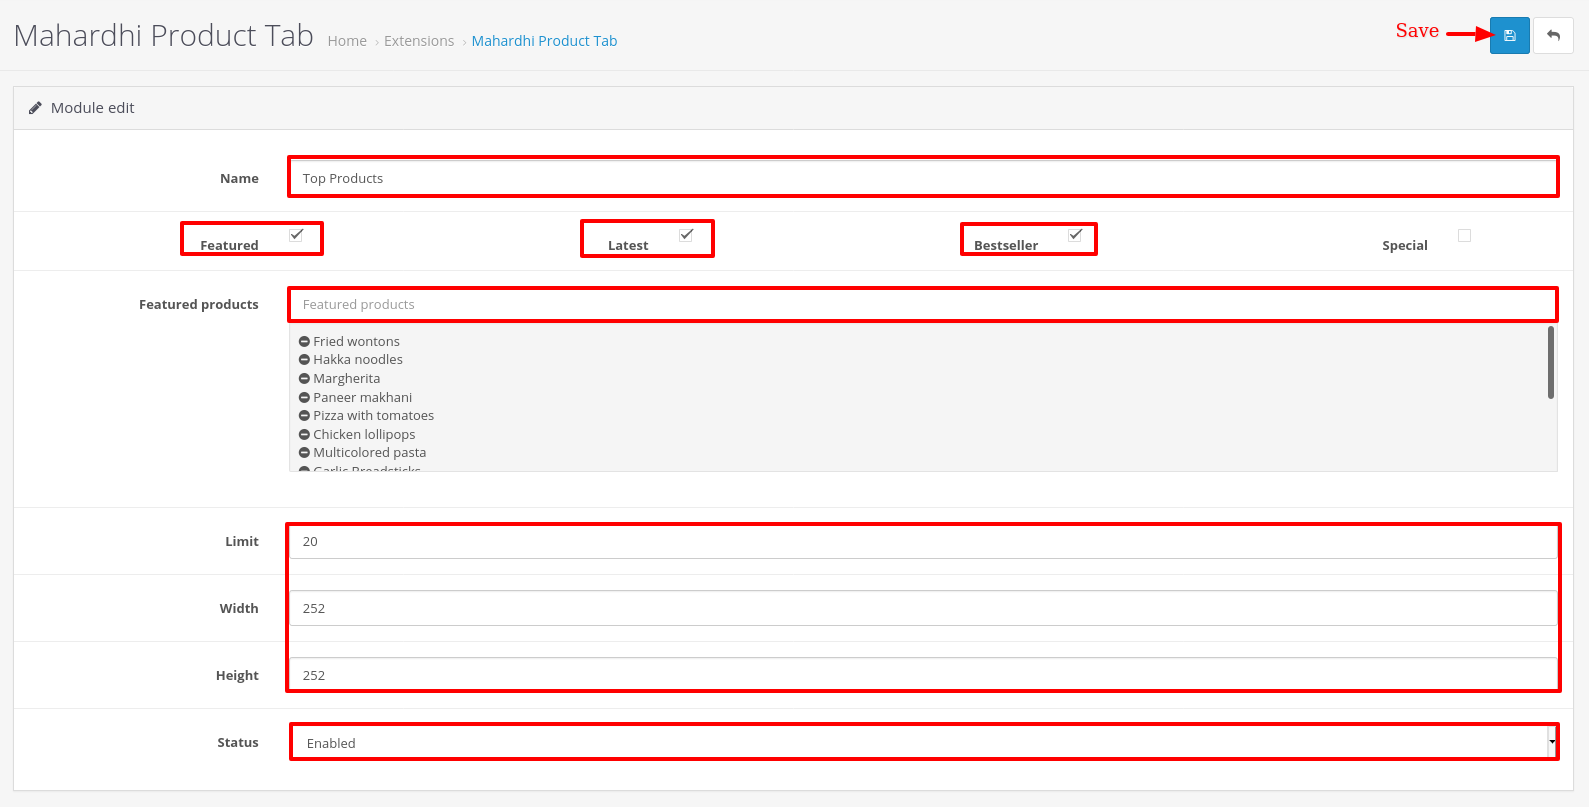
Go to Admin Extensions > Extensions. Select Modules from Dropdown.
and then select Mahardhi Product Tab > Edit
For Homepage Module,
Name : Top Products
select checkbox Featured Latest Bestseller
Limit : 20
Image size : 252 X 252
From Status select : Enable
Click on ”Save” button.
Add mahardhi_product_tab.php from the admin/language/en-gb/extension/module folder to admin/language/your_language/extension/module folder
Add mahardhi_product_tab.php from the catalog/language/en-gb/extension/module folder to catalog/language/your_language/extension/module folder
Admin: Navigation/Design/Language Editor/Add New
Route: extenstion/module/mahardhi_product_tab
Key:
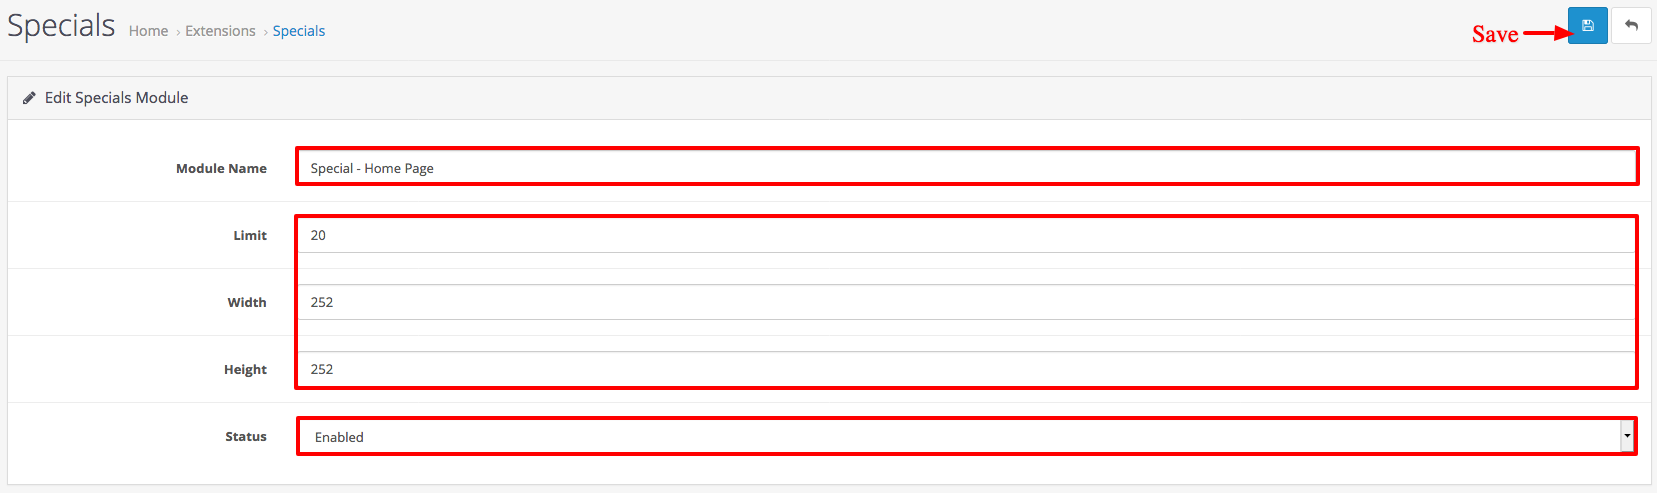
Go to Admin Extensions > Extensions. Select Modules from Dropdown.
and then select Special> Edit
For Homepage Module,
Name : Special - Home page
Limit : 20
Image size : 252 X 252
Status : Enabled
Click on ”Save” button.
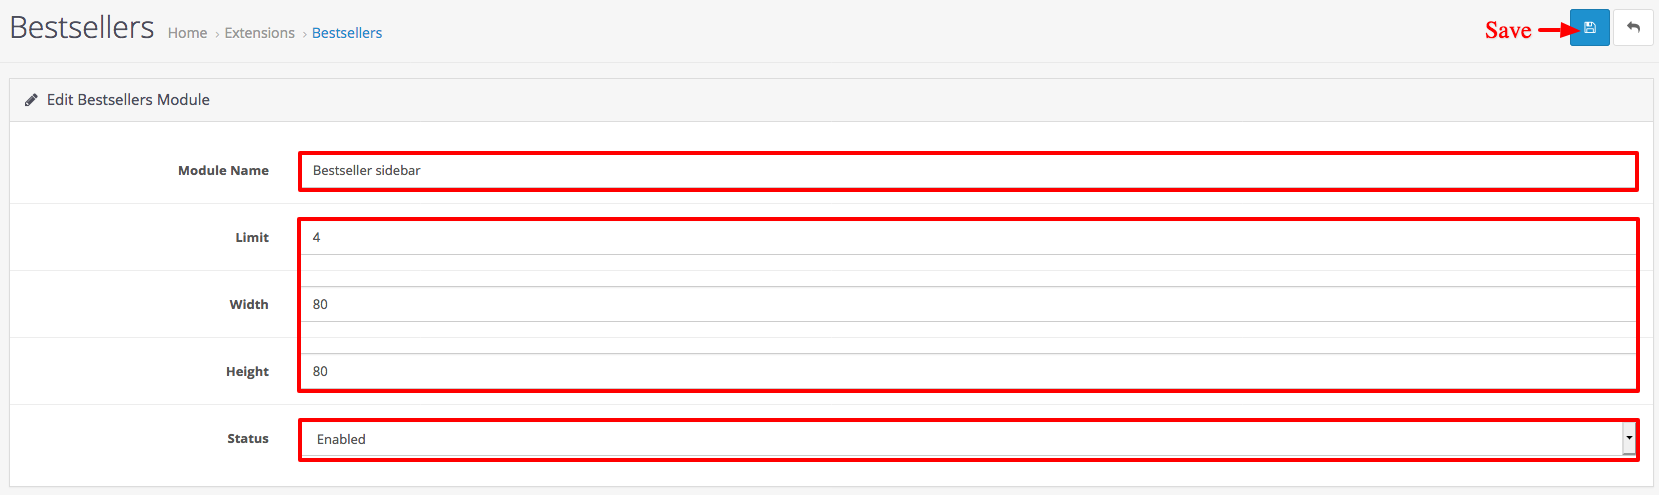
Go to Admin Extensions > Extensions. Select Modules from Dropdown.
And then select Bestseller> Edit ( If Edit link is not active then Click on Install link)
Click + Add New button.
Name : Bestseller sidebar
Limit : 4
Image size : 80 X 80
From Status select : Enabled
Click on ”Save” button.
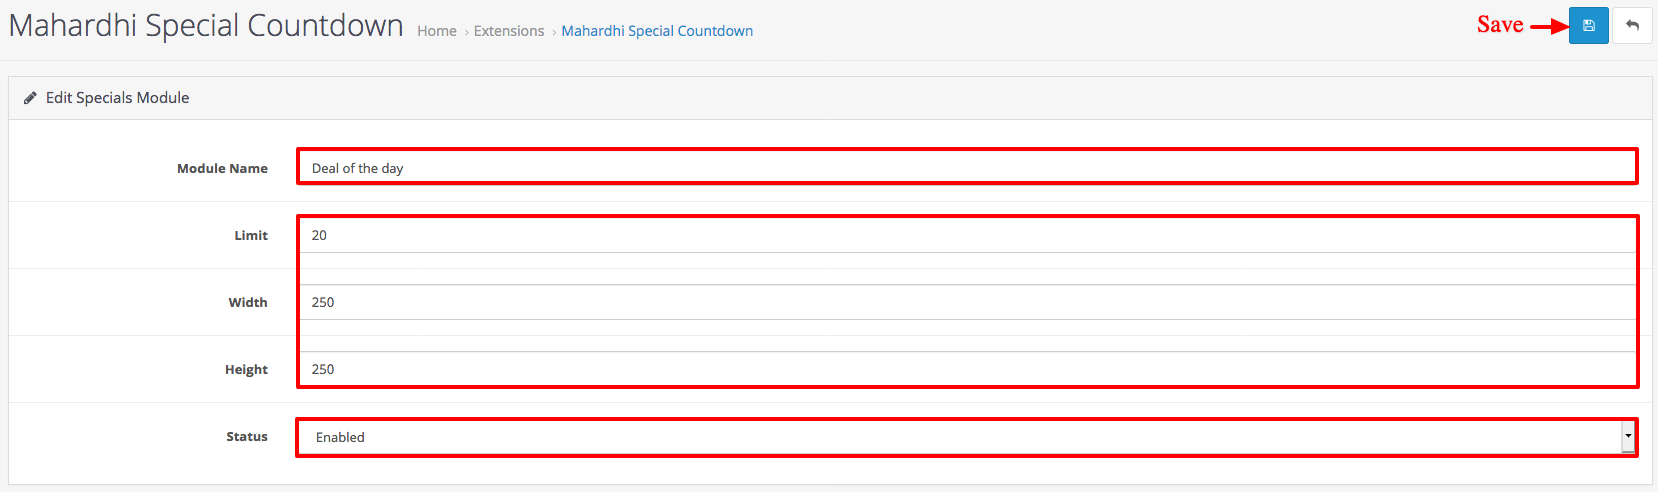
Go to Admin Extensions > Extensions. Select Modules from Dropdown.
and then select Mahardhi Special Countdown > Edit
For Homepage Module,
Name : Deal of the day
Limit : 20
Image size : 250 X 250
From Status select : Enable
Click on ”Save” button.
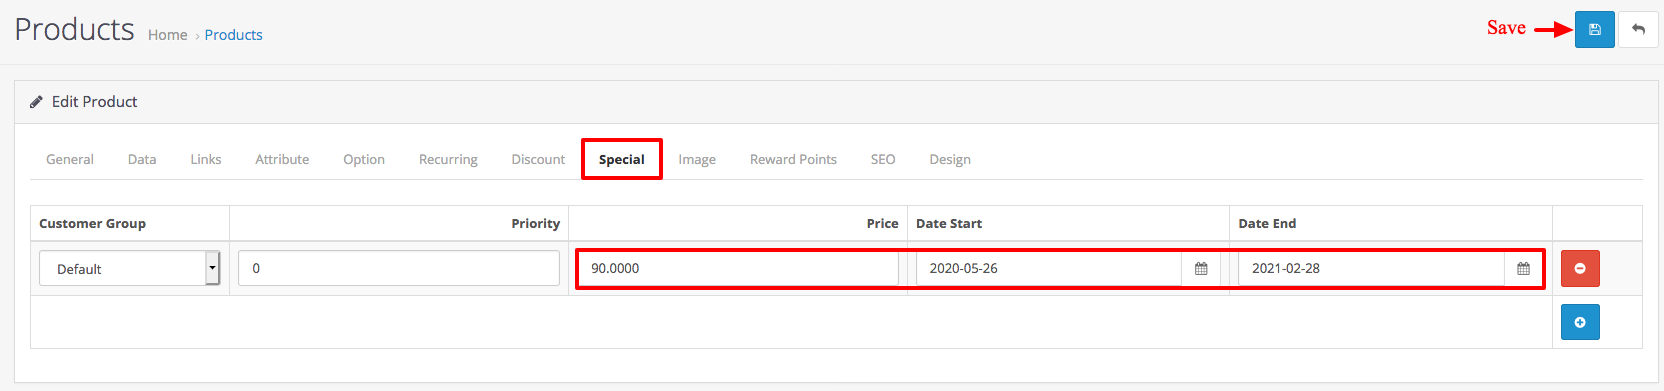
Set Special Product For Deal of the day
Go to Admin > Catalog > Products
And then Click Edit button ( If Edit ) Or Create New Product Click + Add New button.
Now you will see tabs (General, Data, Links, Discount, Special, and Design, etc) Choose Special tab and click Add Special button.
And Add Detail (Price, Date Start, Date End).
Click on ”Save” button.
Add special_countdown.php from the admin/language/en-gb/extension/module folder to admin/language/your_language/extension/module folder
Add special_countdown.php from the catalog/language/en-gb/extension/module folder to catalog/language/your_language/extension/module folder
Admin: Navigation/Design/Language Editor/Add New
Route: extenstion/module/special_countdown
Key:
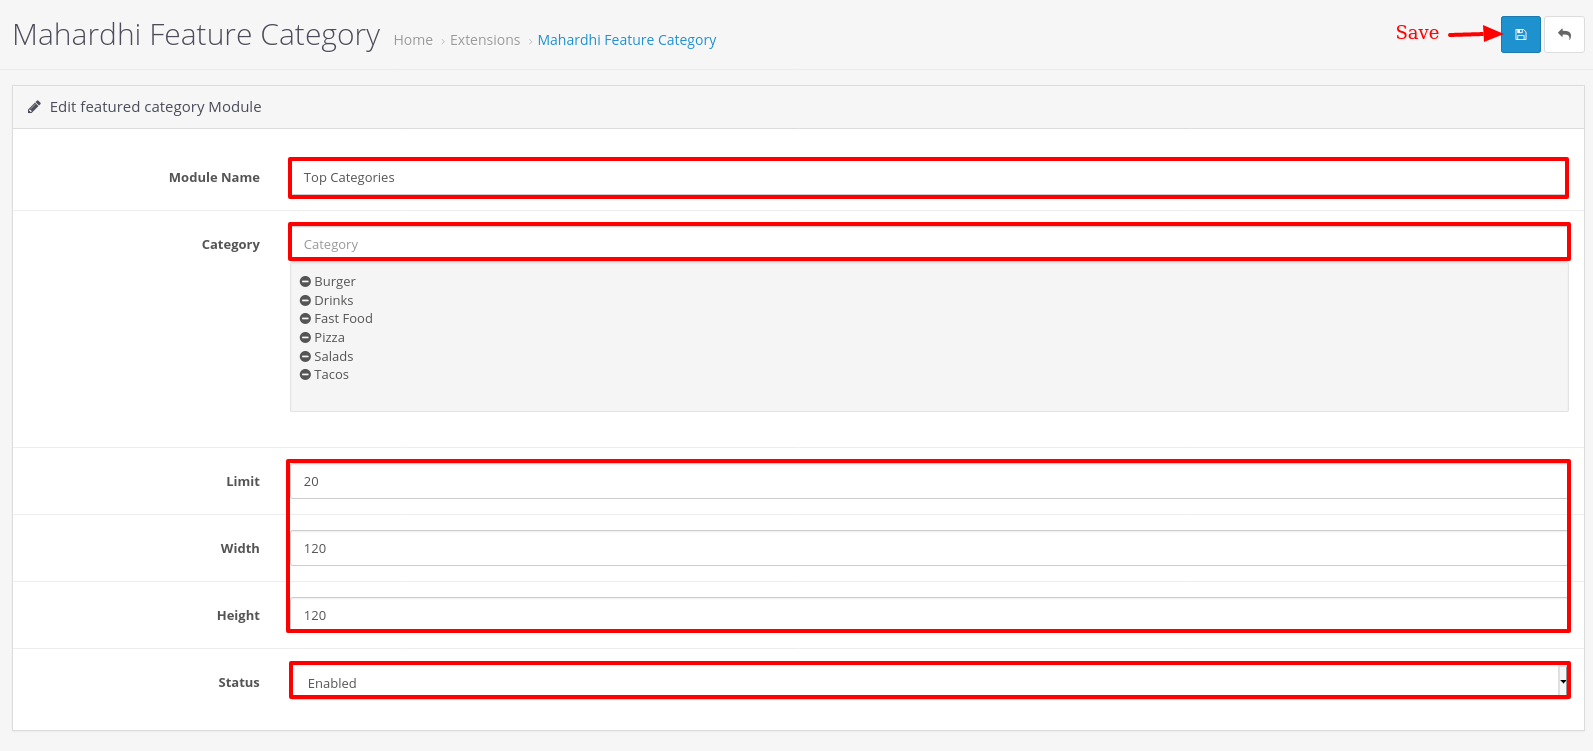
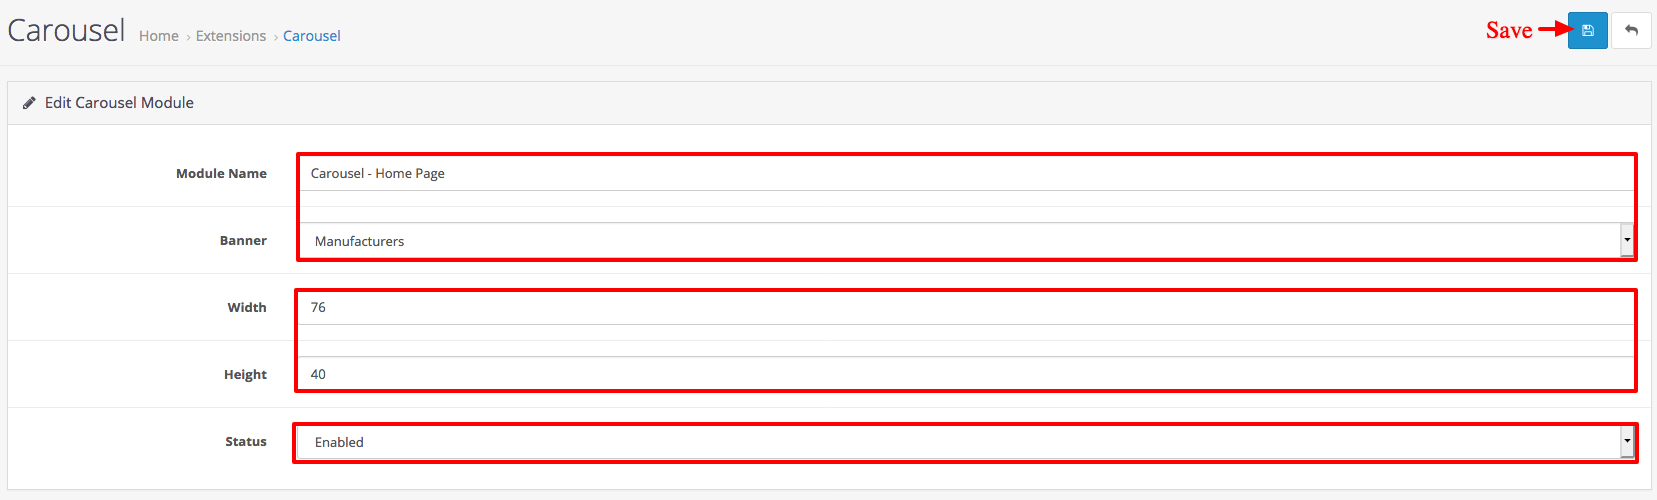
Go to Admin Extensions > Extensions. Select Modules from Dropdown.
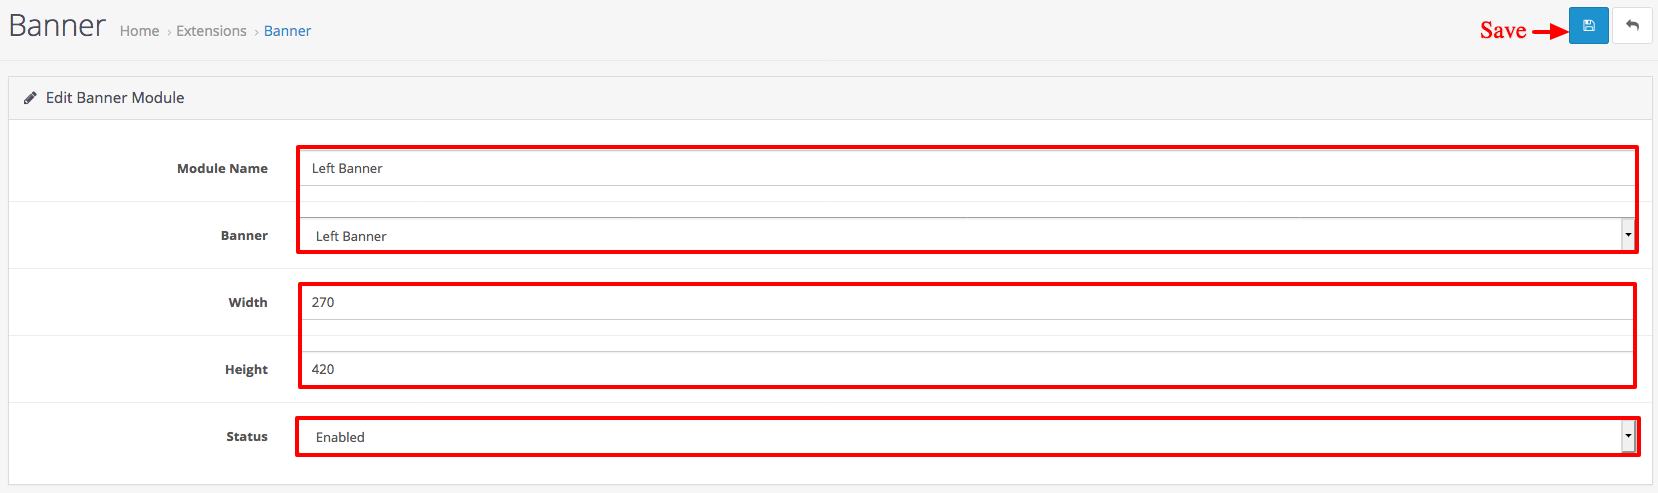
and then select Mahardhi Feature Category > Edit
For Homepage Module,
Module Name : Top Categories
Category : Select Category(add category)
Limit : 20
Width : 169
Height : 169
From Status select : Enable
Click on ”Save” button.
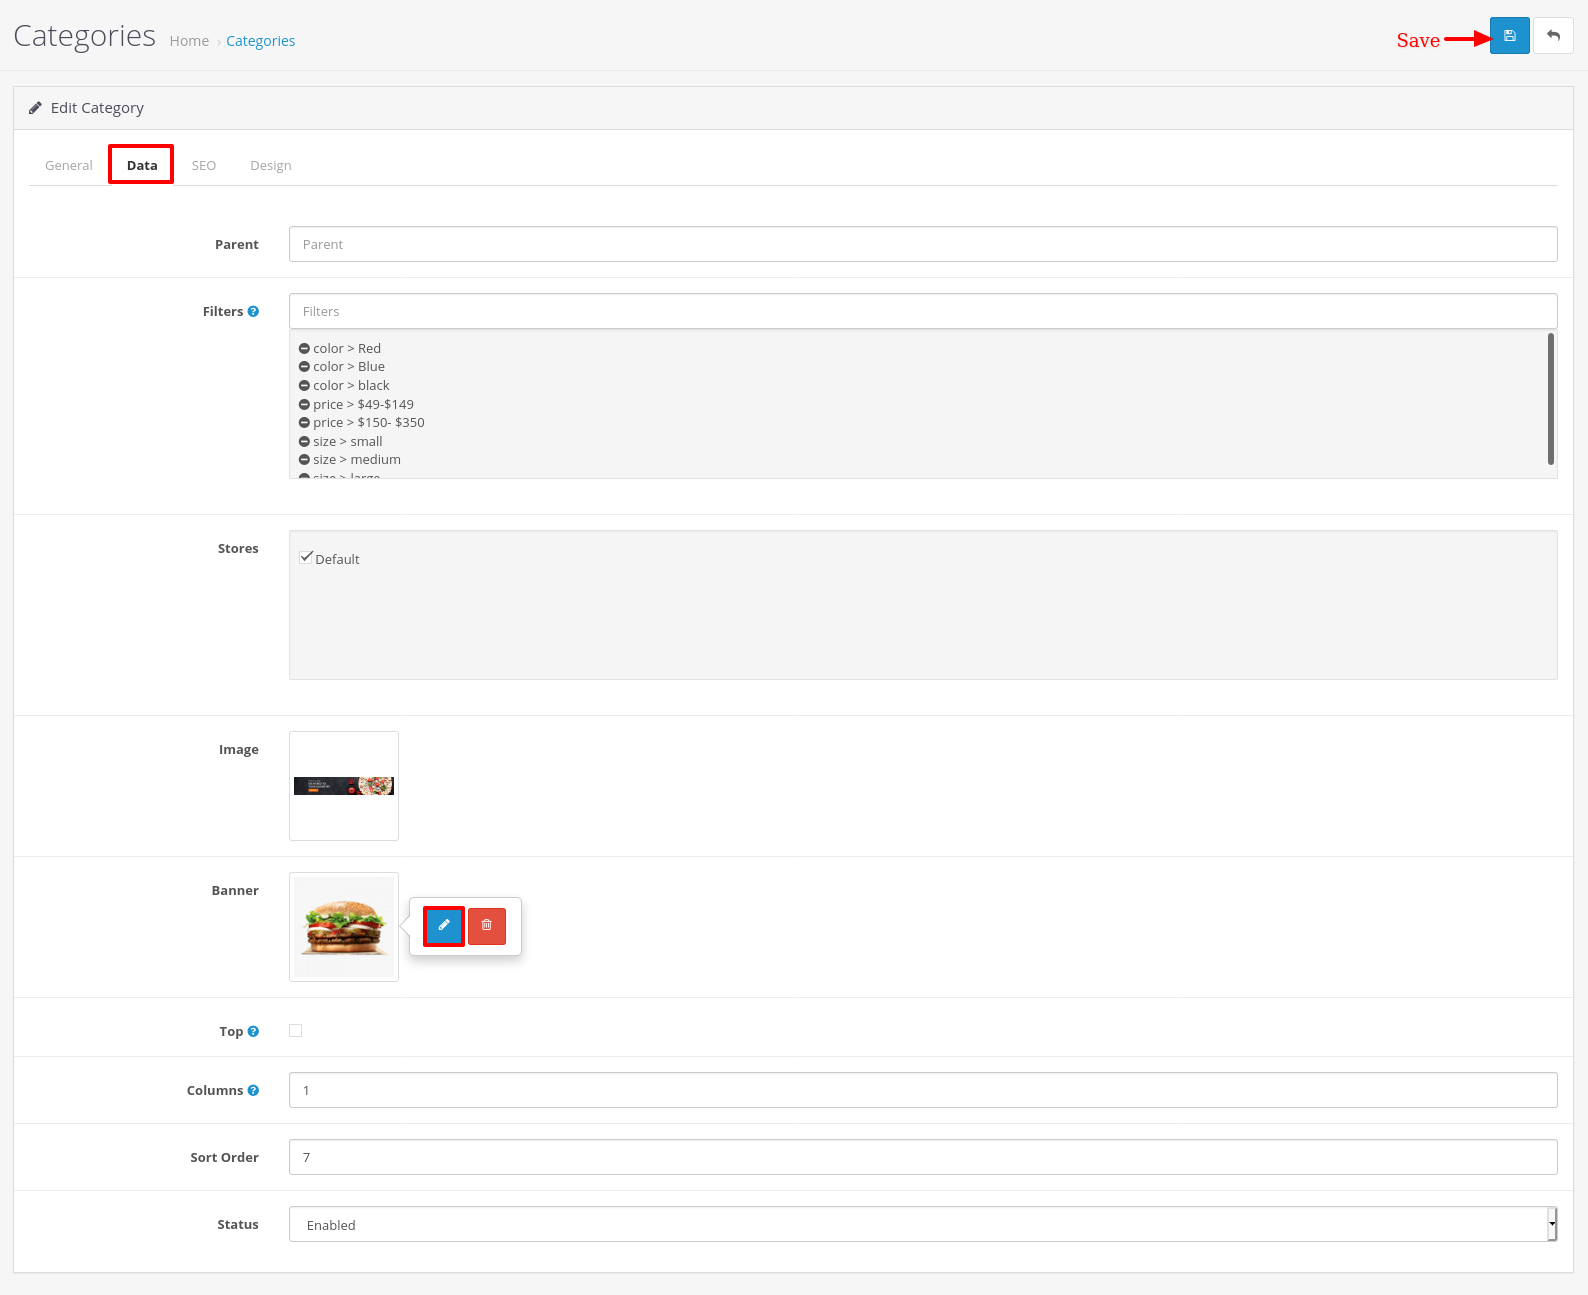
Set Category Image
Go to Admin > Catalog > Categories
And then select Category > Go to Data Tab > Edit banner
Click on ”Save” button.
Add mahardhi_feature_category.php from the admin/language/en-gb/extension/module folder to admin/language/your_language/extension/module folder
Add mahardhi_feature_category.php from the catalog/language/en-gb/extension/module folder to catalog/language/your_language/extension/module folder
Admin: Navigation/Design/Language Editor/Add New
Route: extenstion/module/mahardhi_product_tab
Key:
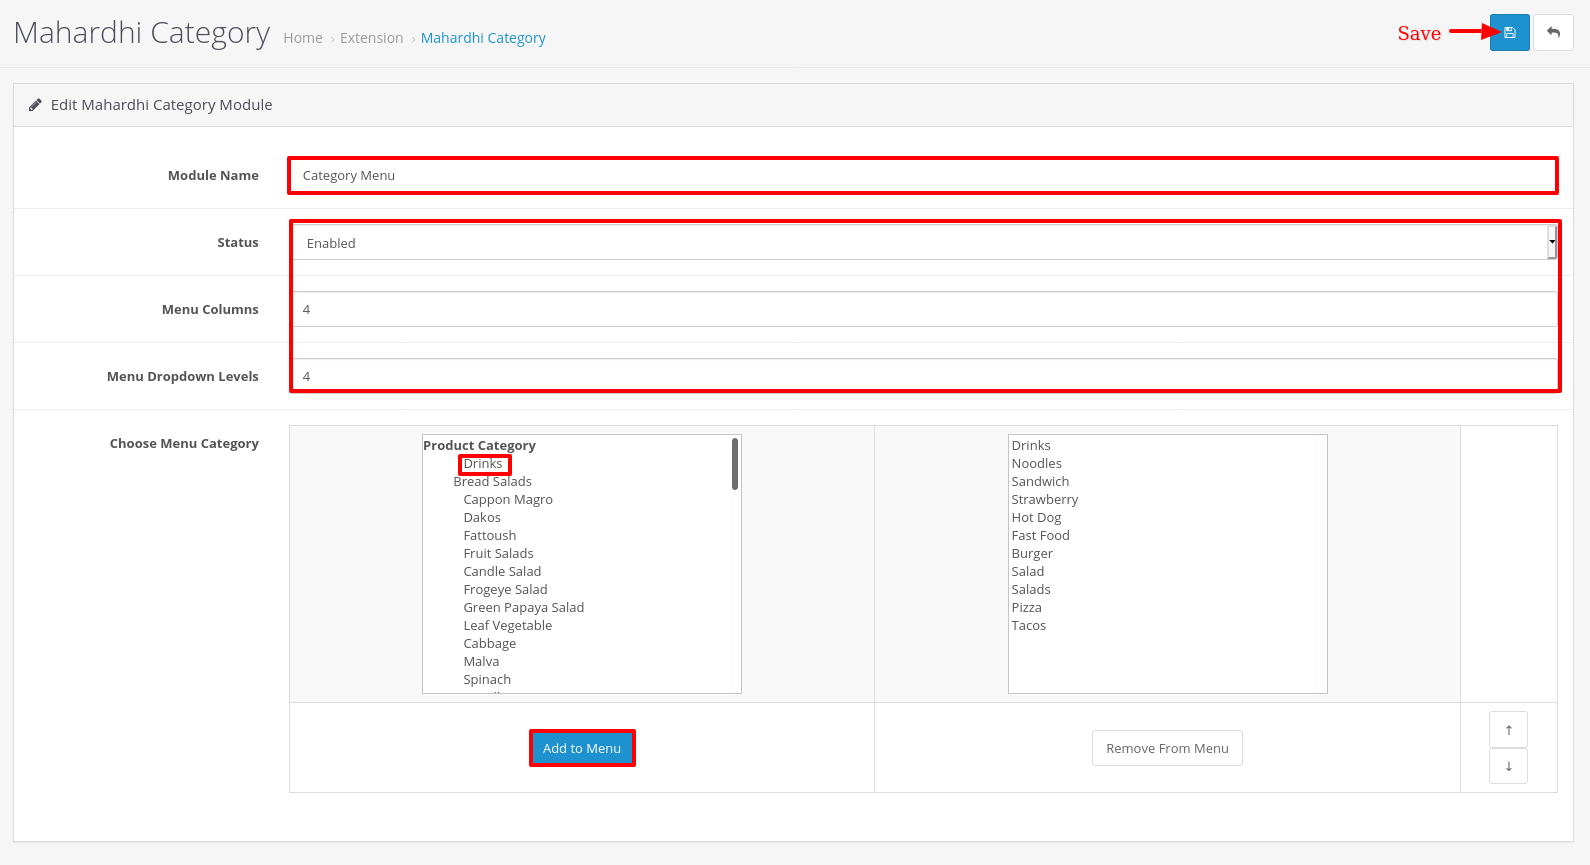
Go to Admin Extensions > Extensions. Select Modules from Dropdown.
and then select Mahardhi Category > Edit
For Homepage Module,
Module Name : Category Menu
From Status select : Enable
Menu Columns : 4
Menu Dropdown Levels : 4
Choose Menu Category : Select Category (Click On Add to Menu button)
Click on ”Save” button.
Add mahardhi_category.php from the admin/language/en-gb/extension/module folder to admin/language/your_language/extension/module folder
Add mahardhi_category.php from the catalog/language/en-gb/extension/module folder to catalog/language/your_language/extension/module folder
Admin: Navigation/Design/Language Editor/Add New
Route: extenstion/module/mahardhi_category
Key:
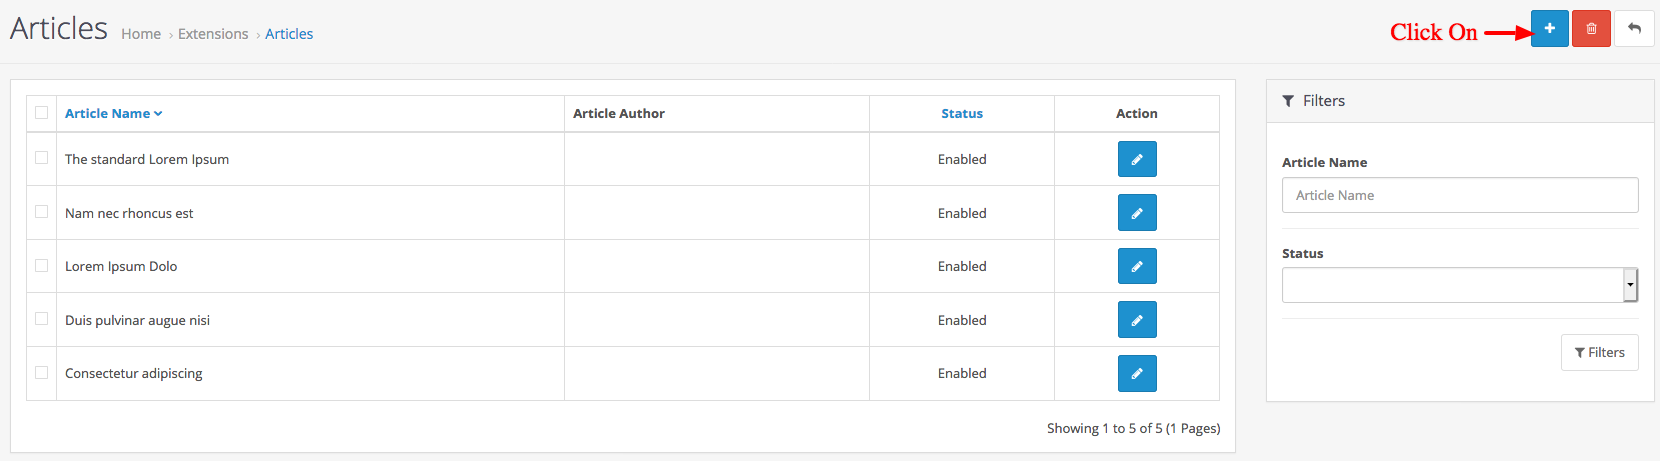
Go to Admin Extensions > Extensions. Select Modules from Dropdown.
And then select Mahardhi Blog > Edit ( If Edit link is not active then Click on Install link)
And then click Article Blog Categories left side of then show Categories

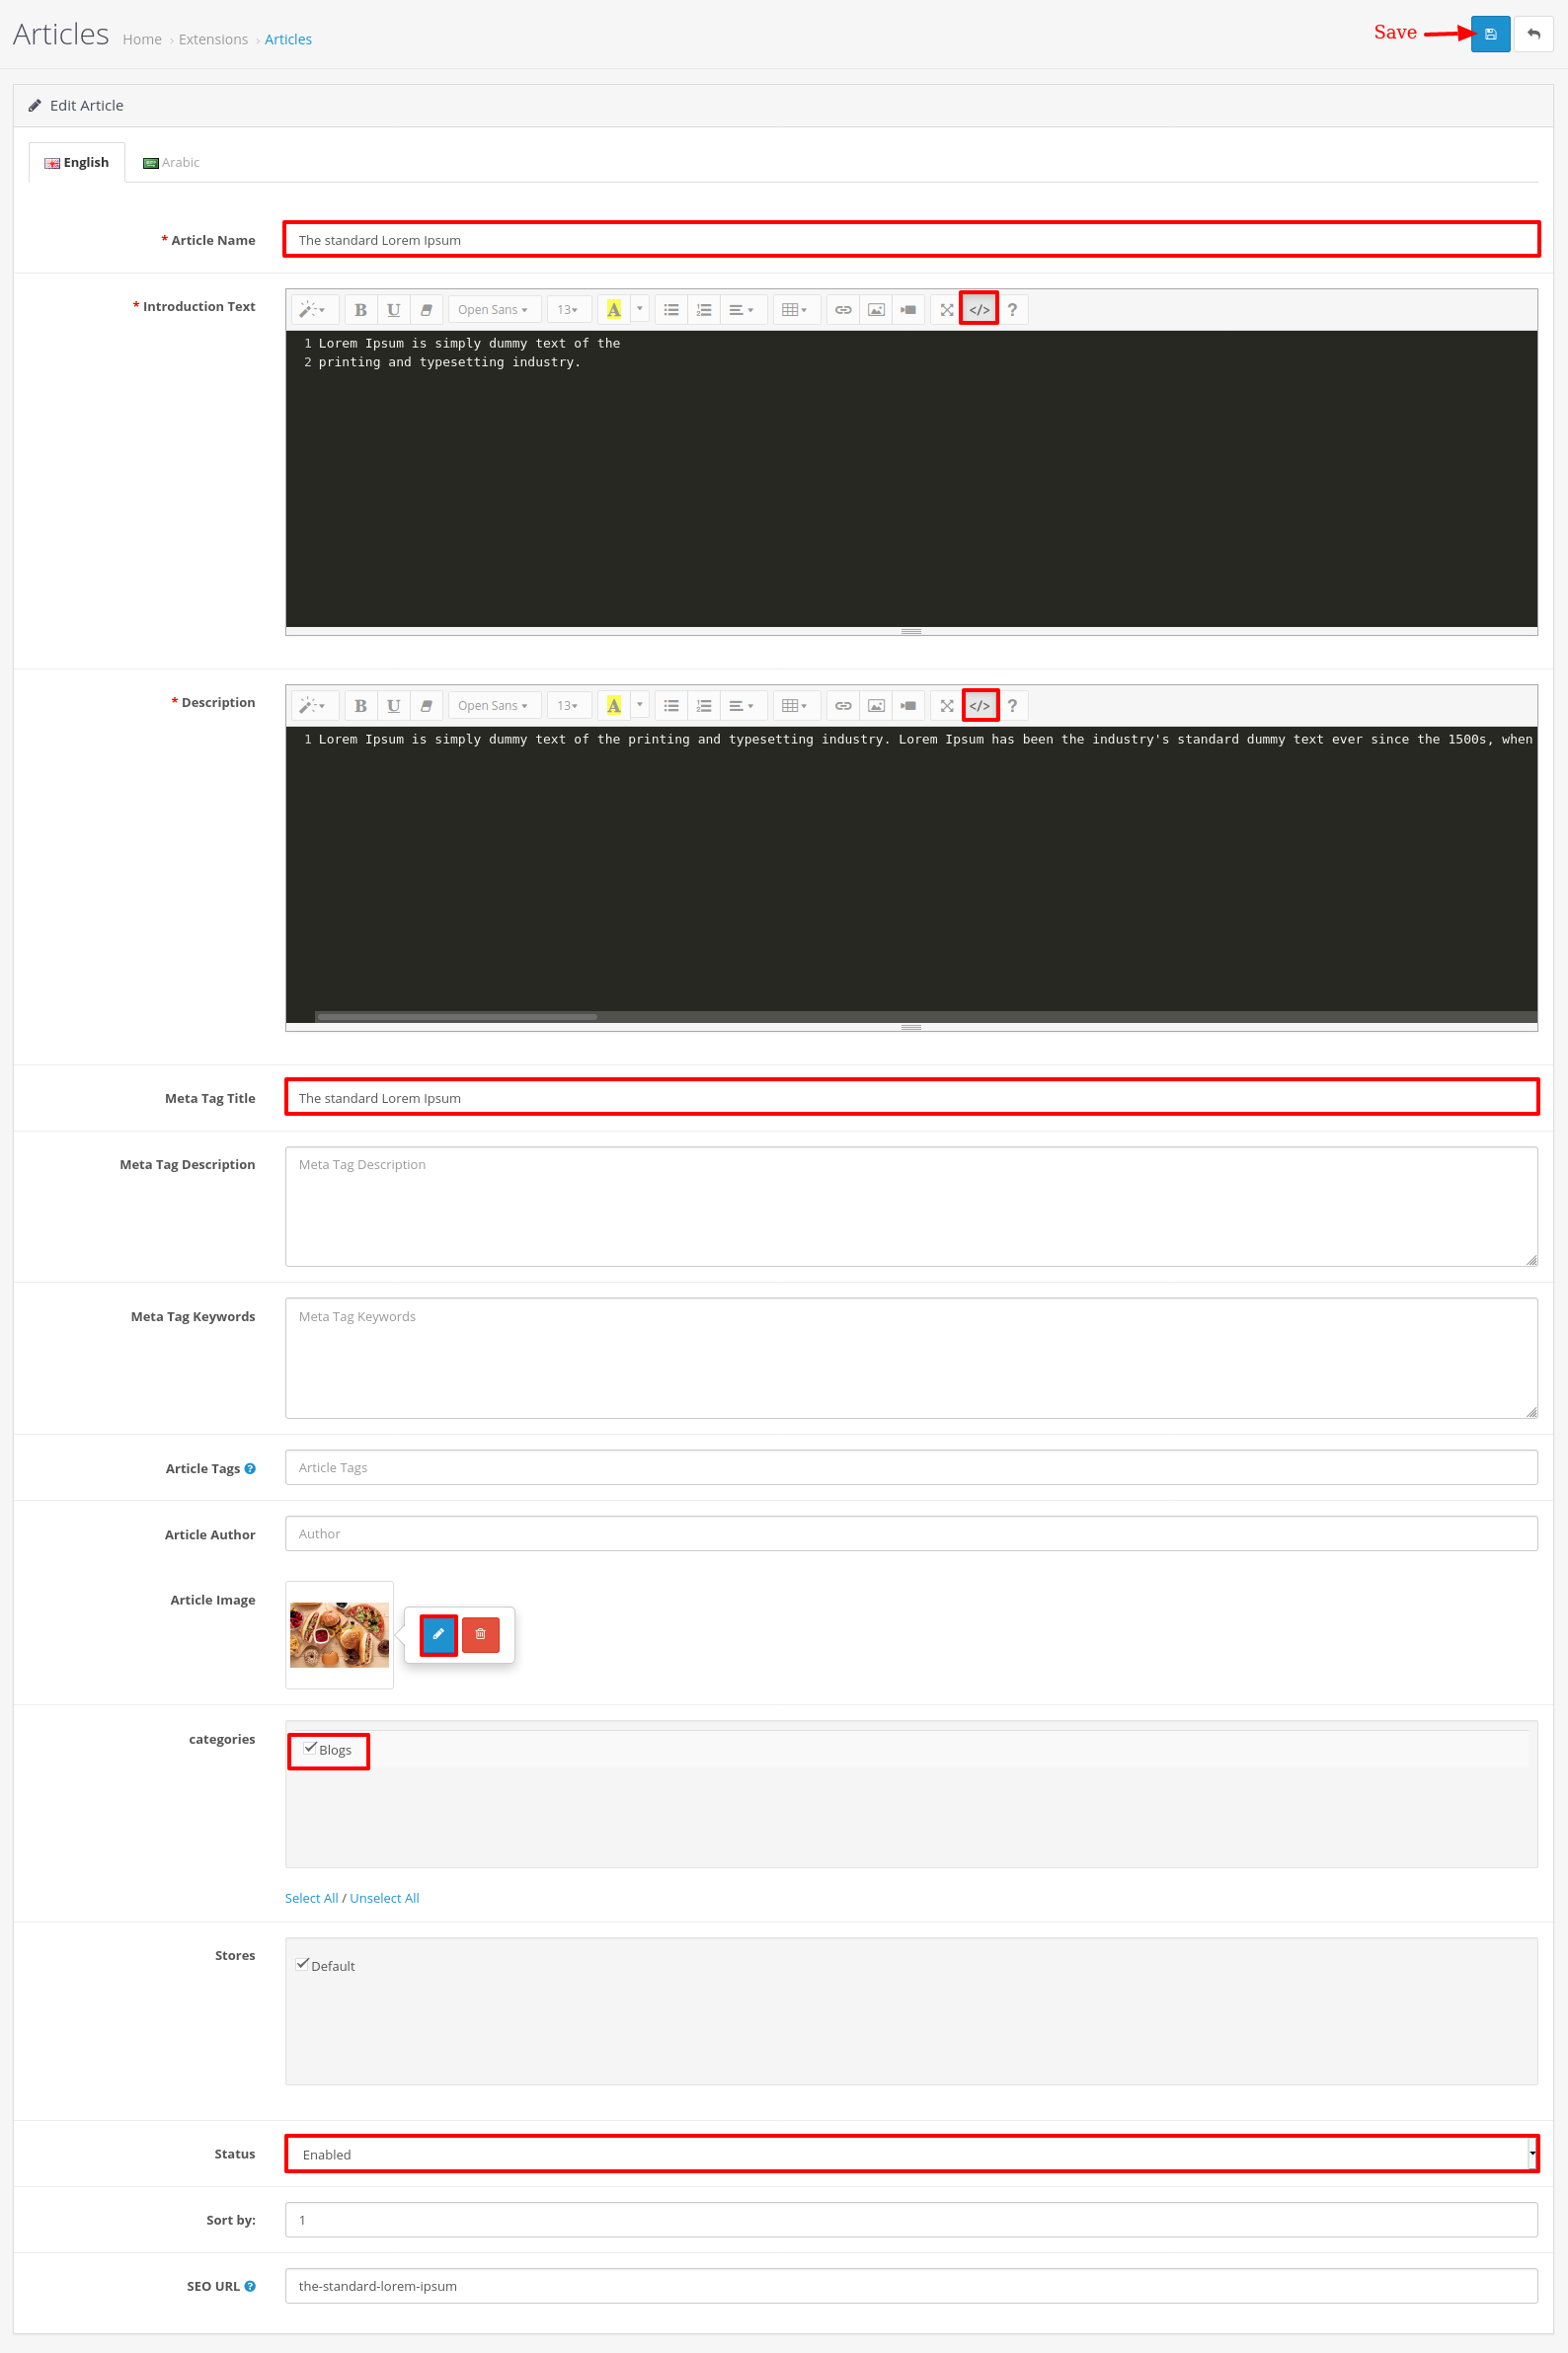
Go to Admin Extensions > Extensions. Select Modules from Dropdown.
And then select Mahardhi Blog > Edit
And then click categories top of Header part
Now click on + Add new button
Category Blog Name : Blogs
From Status select : Enabled
Sort order : 1
Click on ”Save” button.
Go to Admin Extensions > Extensions. Select Modules from Dropdown.
And then select Mahardhi Blog > Edit
And then click on Article List > top of Header part

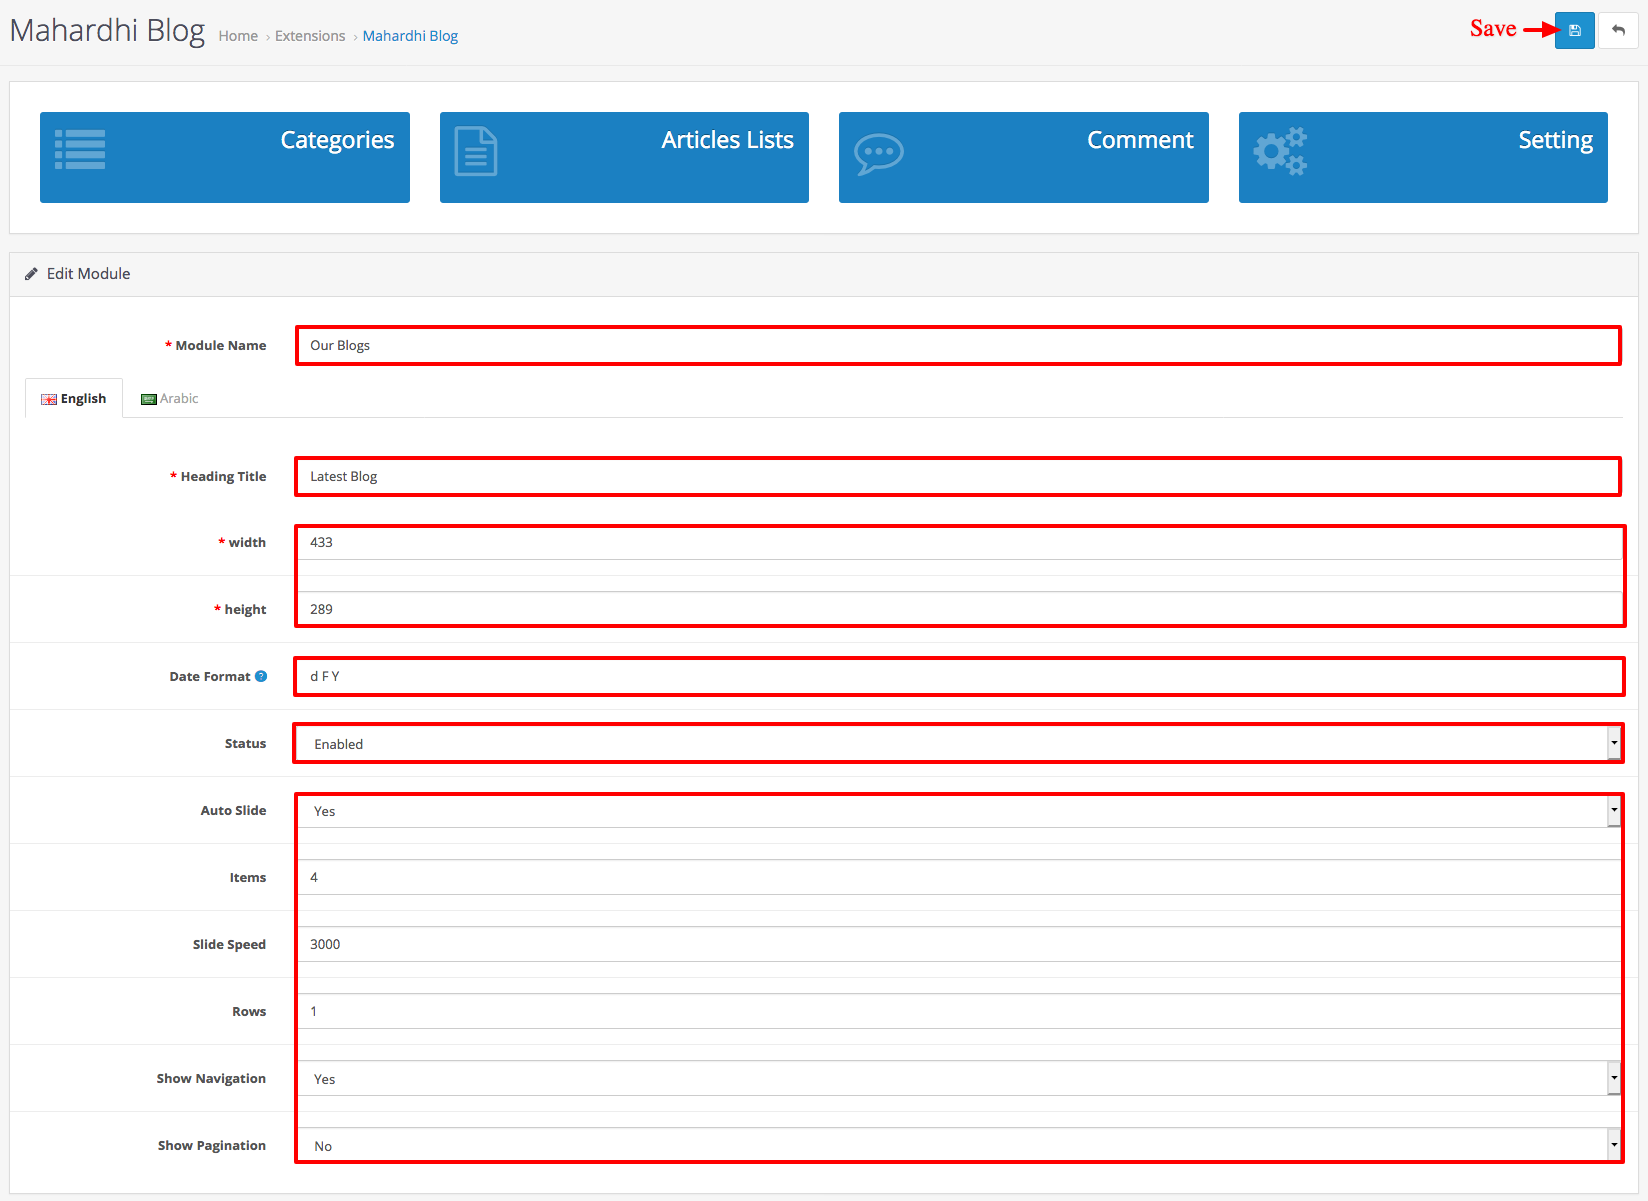
Go to Admin >Extensions > Extensions. Select Modules from Dropdown.
And then select Mahardhi Blog > Edit ( If Edit link is not active then Click on Install link)
Module Name : Our Blogs
Heading title : Latest Blog
Give Image size width and height : 433 X 289
The date format for material : d F Y
From Status : Enable select
Auto Slide : Yes select
Item : 4
Slide Speed : 3000
Rows : 1
Show Navigation : Yes select
Show Pagination : No select
Click on ”Save” button.
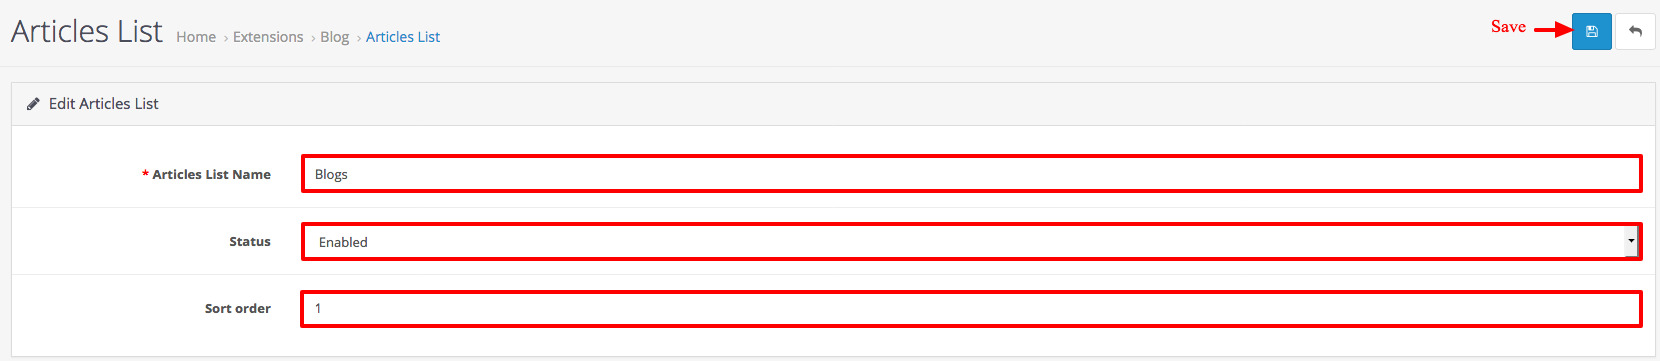
Go to Admin >Extensions > Extensions. Select Modules from Dropdown.
And then select Mahardhi Blog > Edit ( If Edit link is not active then Click on Install link)
And then click on Article List > top of Header part

This setting for Article List page images and the single Article List page image
Default Blog Per Page : 9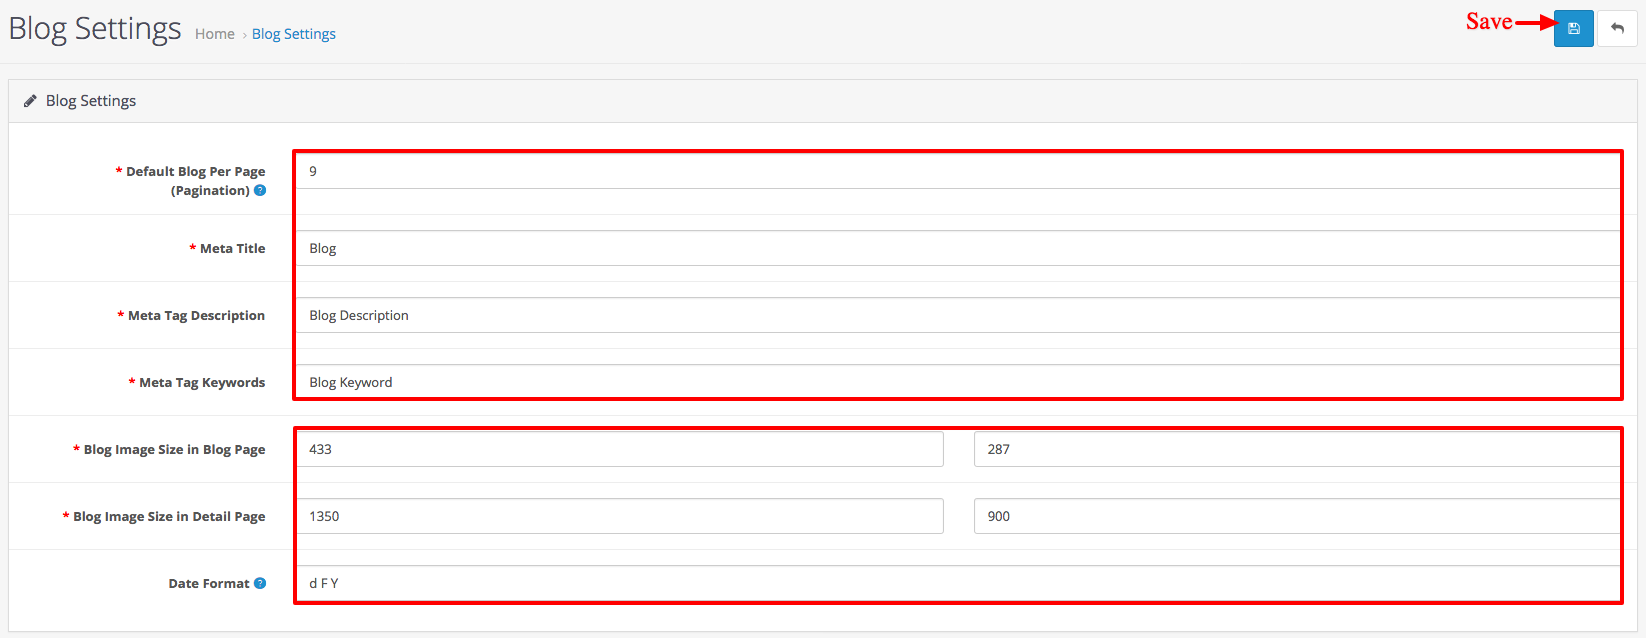
Add blog.php from the admin/language/en-gb/extension/module folder to admin/language/your_language/extension/module folder
Add blog.php from the catalog/language/en-gb/extension/module folder to catalog/language/your_language/extension/module folder
Admin: Navigation/Design/Language Editor/Add New
Route: extenstion/module/blog
Key:
Go to Admin Extensions > Extensions. Select Modules from Dropdown.
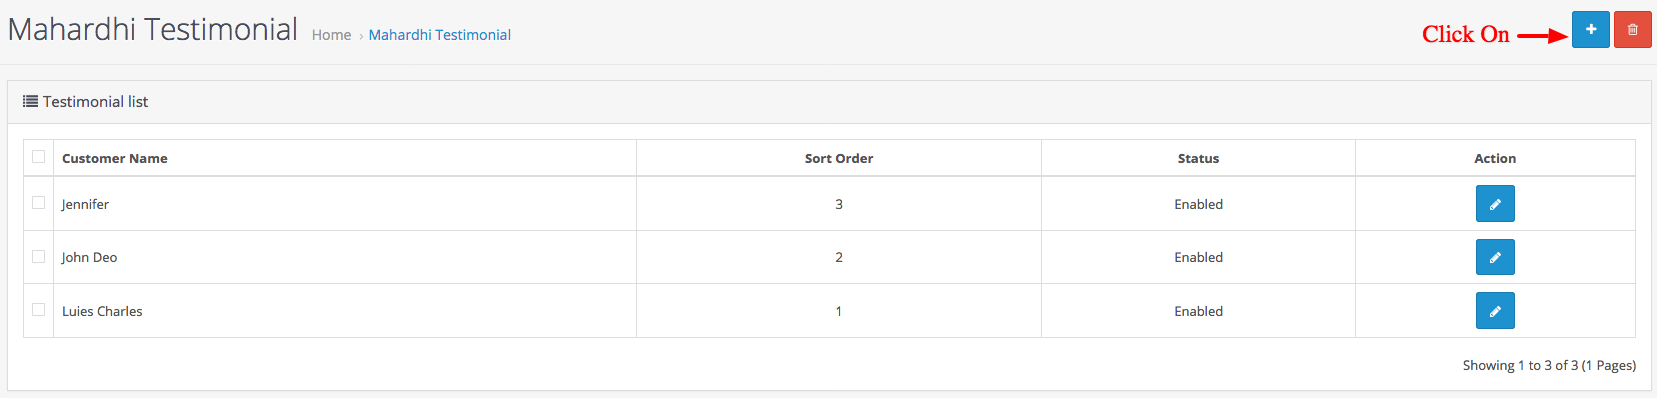
And then select Mahardhi Testimonial > Edit ( If Edit link is not active then Click on Install link)
And then click Button > on Top of header then near Save button
now click on + Add new or Edit button.
Lorem Ipsum is simply dummy text of the printing and typesetting industry. Ut enim ad minim veniam, quis nostrud exercitation ullamco laboris nisi.
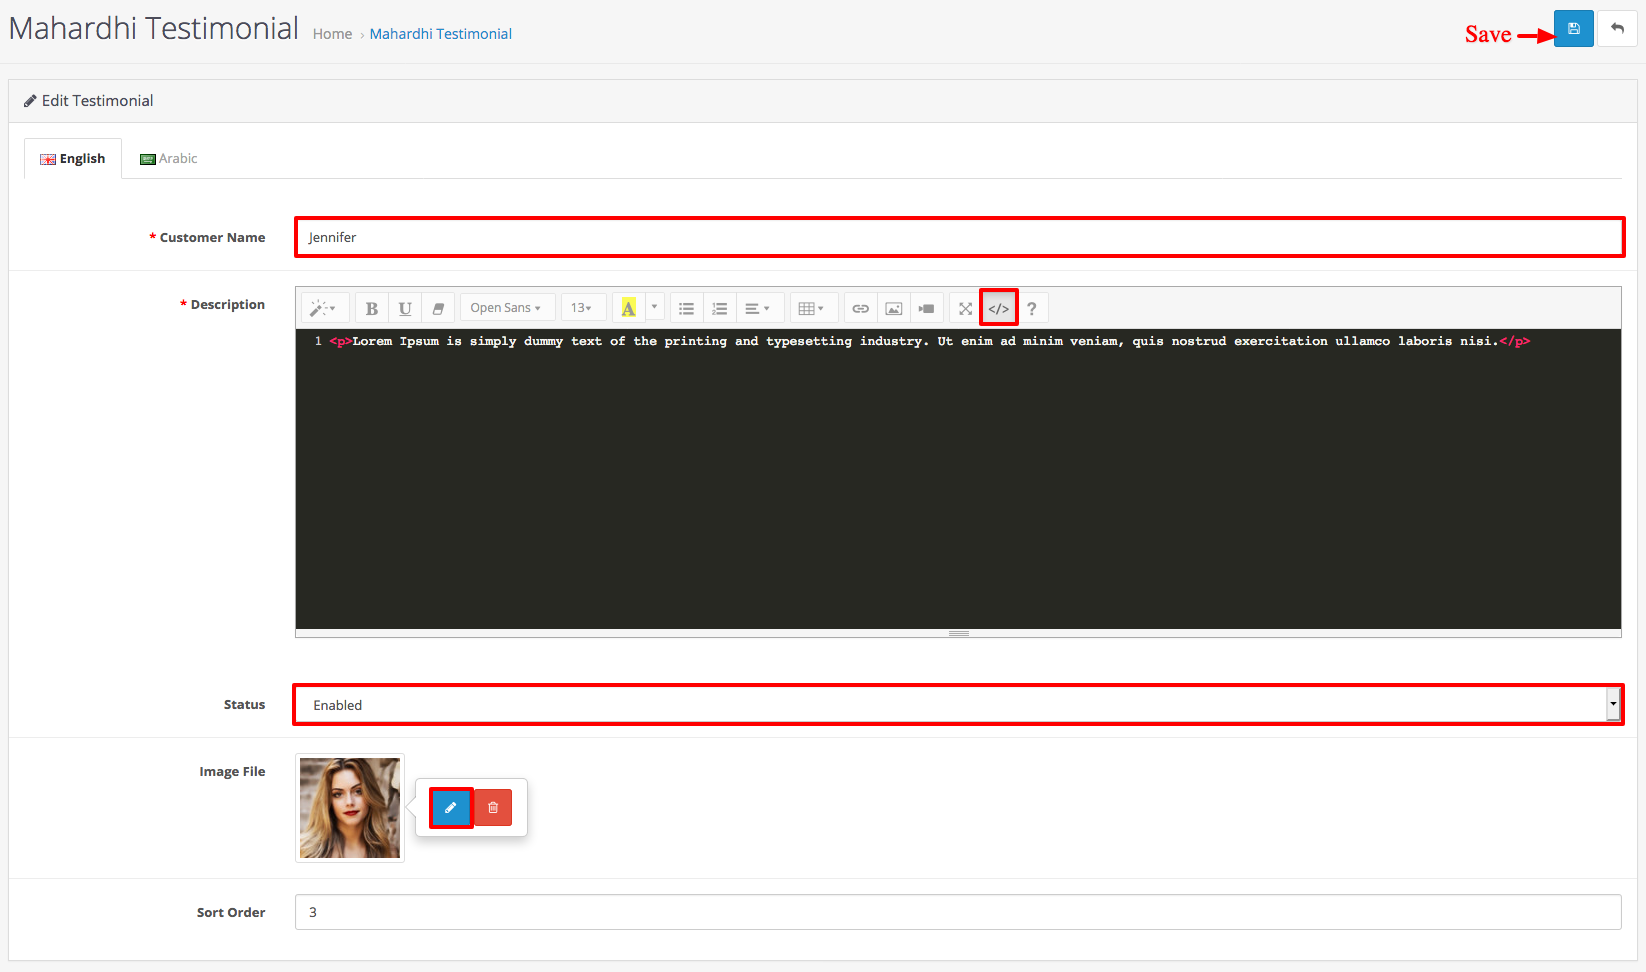
Lorem Ipsum is simply dummy text of the printing and typesetting industry. Ut enim ad minim veniam, quis nostrud exercitation ullamco laboris nisi.
Lorem Ipsum is simply dummy text of the printing and typesetting industry. Ut enim ad minim veniam, quis nostrud exercitation ullamco laboris nisi.
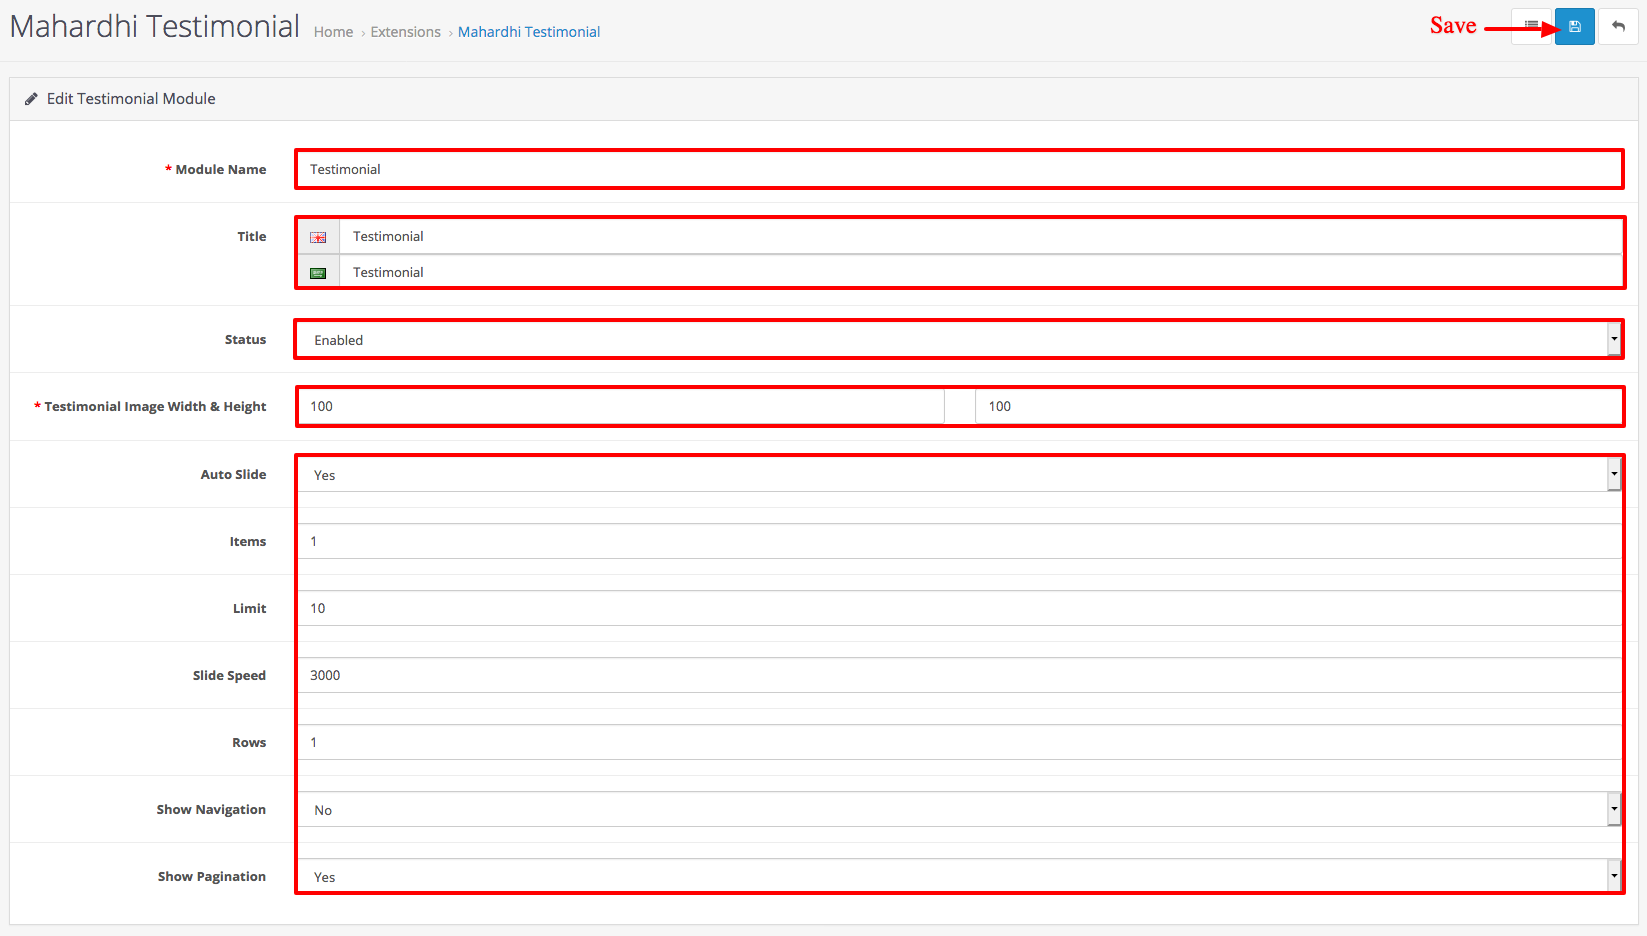
Go to Admin >Extensions > Extensions. Select Modules from Dropdown.
And then select Maharthi Testimonial > Edit ( If Edit link is not active then Click on Install link)
Module Name : Testimonial
title : Testimonial
Status : Enabled
Testimonial Image Width & Height : 100 X 100
Auto Slide : Yes select
Items : 1
Limit : 10
Slide Speed : 3000
Rows : 1
Show Navigation : No select
Show Pagination : Yes select
Click on ”Save” button.
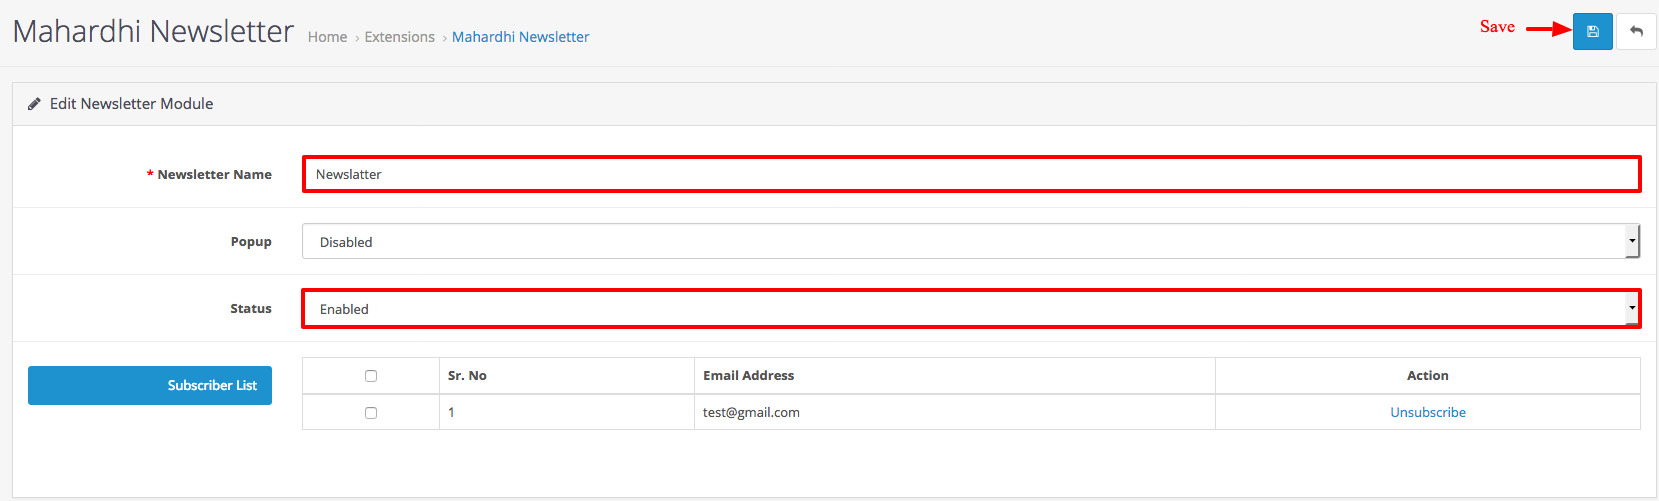
Go to Admin > Extensions > Extensions. Select Modules from Dropdown.
And then select Mahardhi Newsletter > Edit ( If Edit link is not active then Click on Install link)
Newslatter Name : Newslatter
popup : Enable (For Newslatter popup if you want to popup newslatter then select Enable)
From Status select : Enable
Click on ”Save” button.
Go to Admin > Extensions > Extensions. Select Modules from Dropdown.
And then select Mahardhi Newsletter > Edit ( If Edit link is not active then Click on Install link)
Newslatter Name : Newsletter popup
popup : Enable (For Newslatter popup if you want to popup newslatter then select Enable)
From Status select : Enable
Click on ”Save” button.

Add mahardhi_newsletter.php from the catalog/language/en-gb/extension/module folder to catalog/language/your_language/extension/module folder
Add mahardhi_newsletter.php from the admin/language/en-gb/extension/module folder to admin/language/your_language/extension/module folder
Admin: Navigation/Design/Language Editor/Add New
Route: extenstion/module/mahardhi_newsletter
Key:
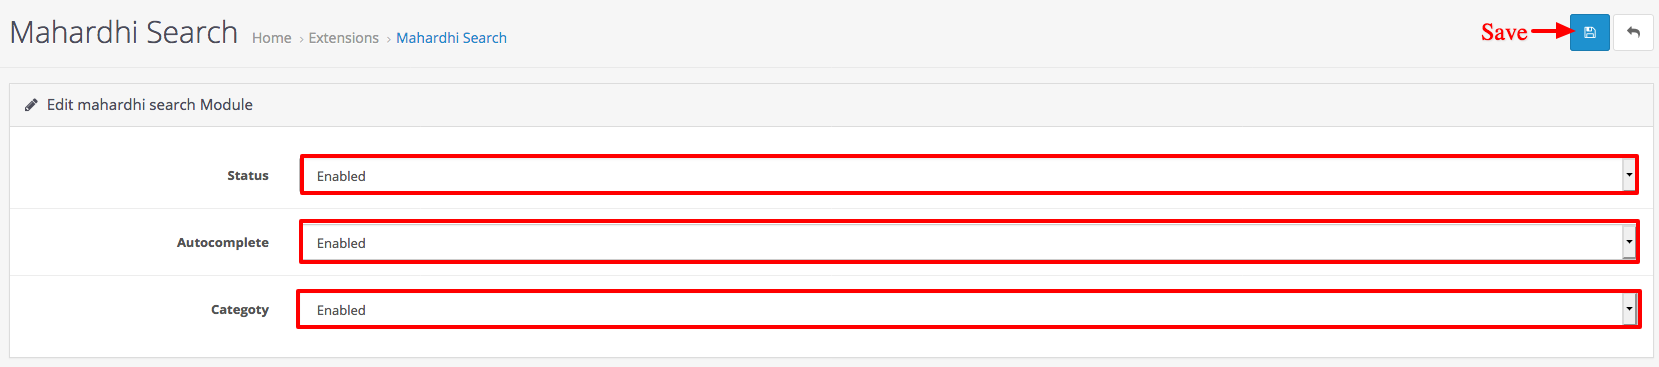
Go to Admin Extensions > Extensions. Select Modules from Dropdown.
And then select Mahardhi Search > Edit
From Status select: Enabled
Autocomplete : Enabled (If add Autocomplete option)
Category : Enabled (If add category option)
Click on Save button.
Add mahardhi_search.php from the catalog/language/en-gb/extension/module folder to catalog/language/your_language/extension/module folder
Add mahardhi_search.php from the admin/language/en-gb/extension/module folder to admin/language/your_language/extension/module folder
Admin: Navigation/Design/Language Editor/Add New
Route: extenstion/module/mahardhi_search
Key:
Go to Admin Extensions > Extensions. Select Modules from Dropdown.
And then select Account > Edit
From Status select: Enable
Click on Save button.
Go to Admin Extensions > Extensions. Select Modules from Dropdown.
And Then select Information > Edit ( If Edit link is not active then Click on Install link)
From Status select: Enable
Click on ”Save” button.
Go to Admin Extensions > Extensions. Select Modules from Dropdown.
And Then select Filter > Edit ( If Edit link is not active then Click on Install link)
From Status select: Enable
Click on ”Save” button.
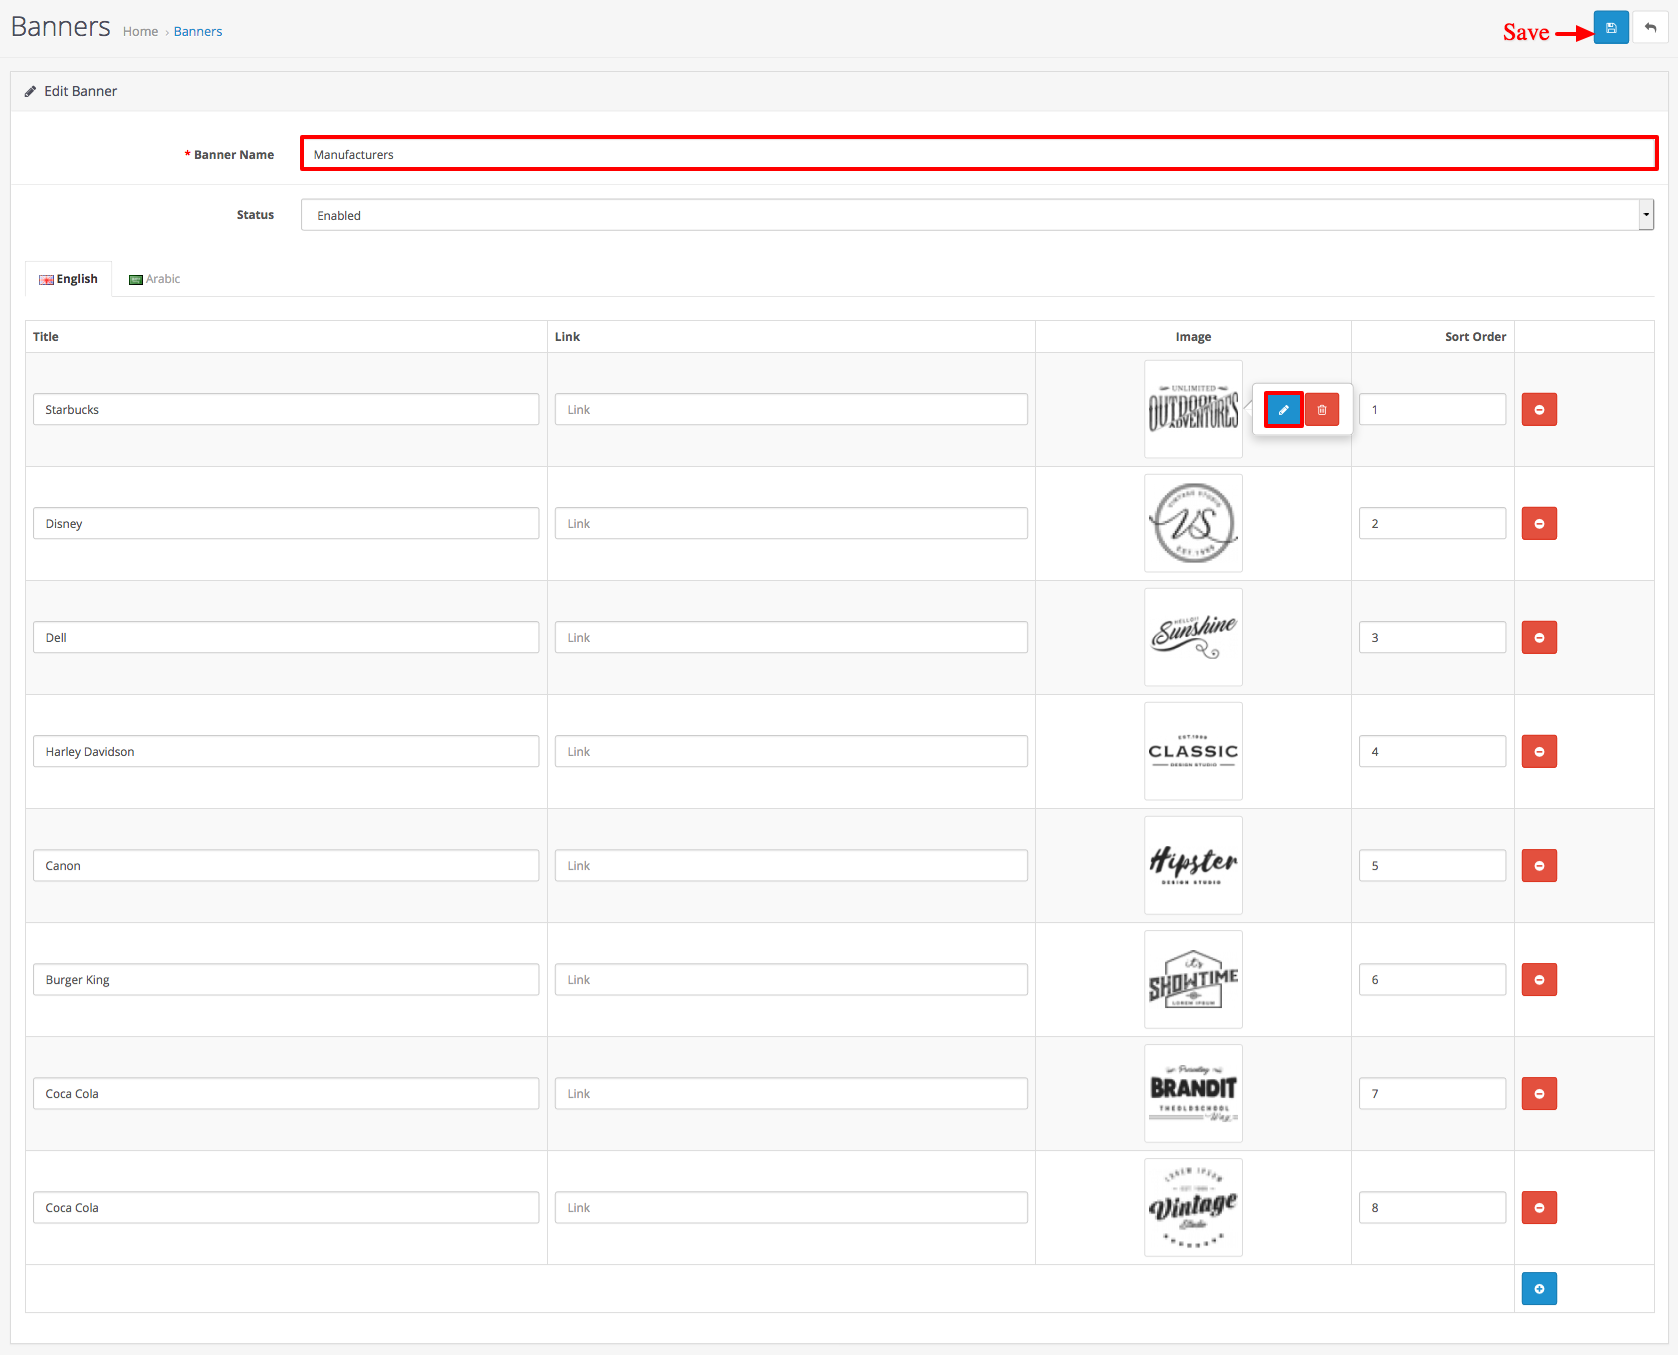
Goto Admin Design > Banners
Now ”+ Add New ” button.
Banner name : Manufacturers
Status : Enabled
and then click on + Add button
set size of each image banner of your site
Give title of your banner and click on image to upload your banner
and then again click on + Add button and upload another banners
then click ”Save” button.
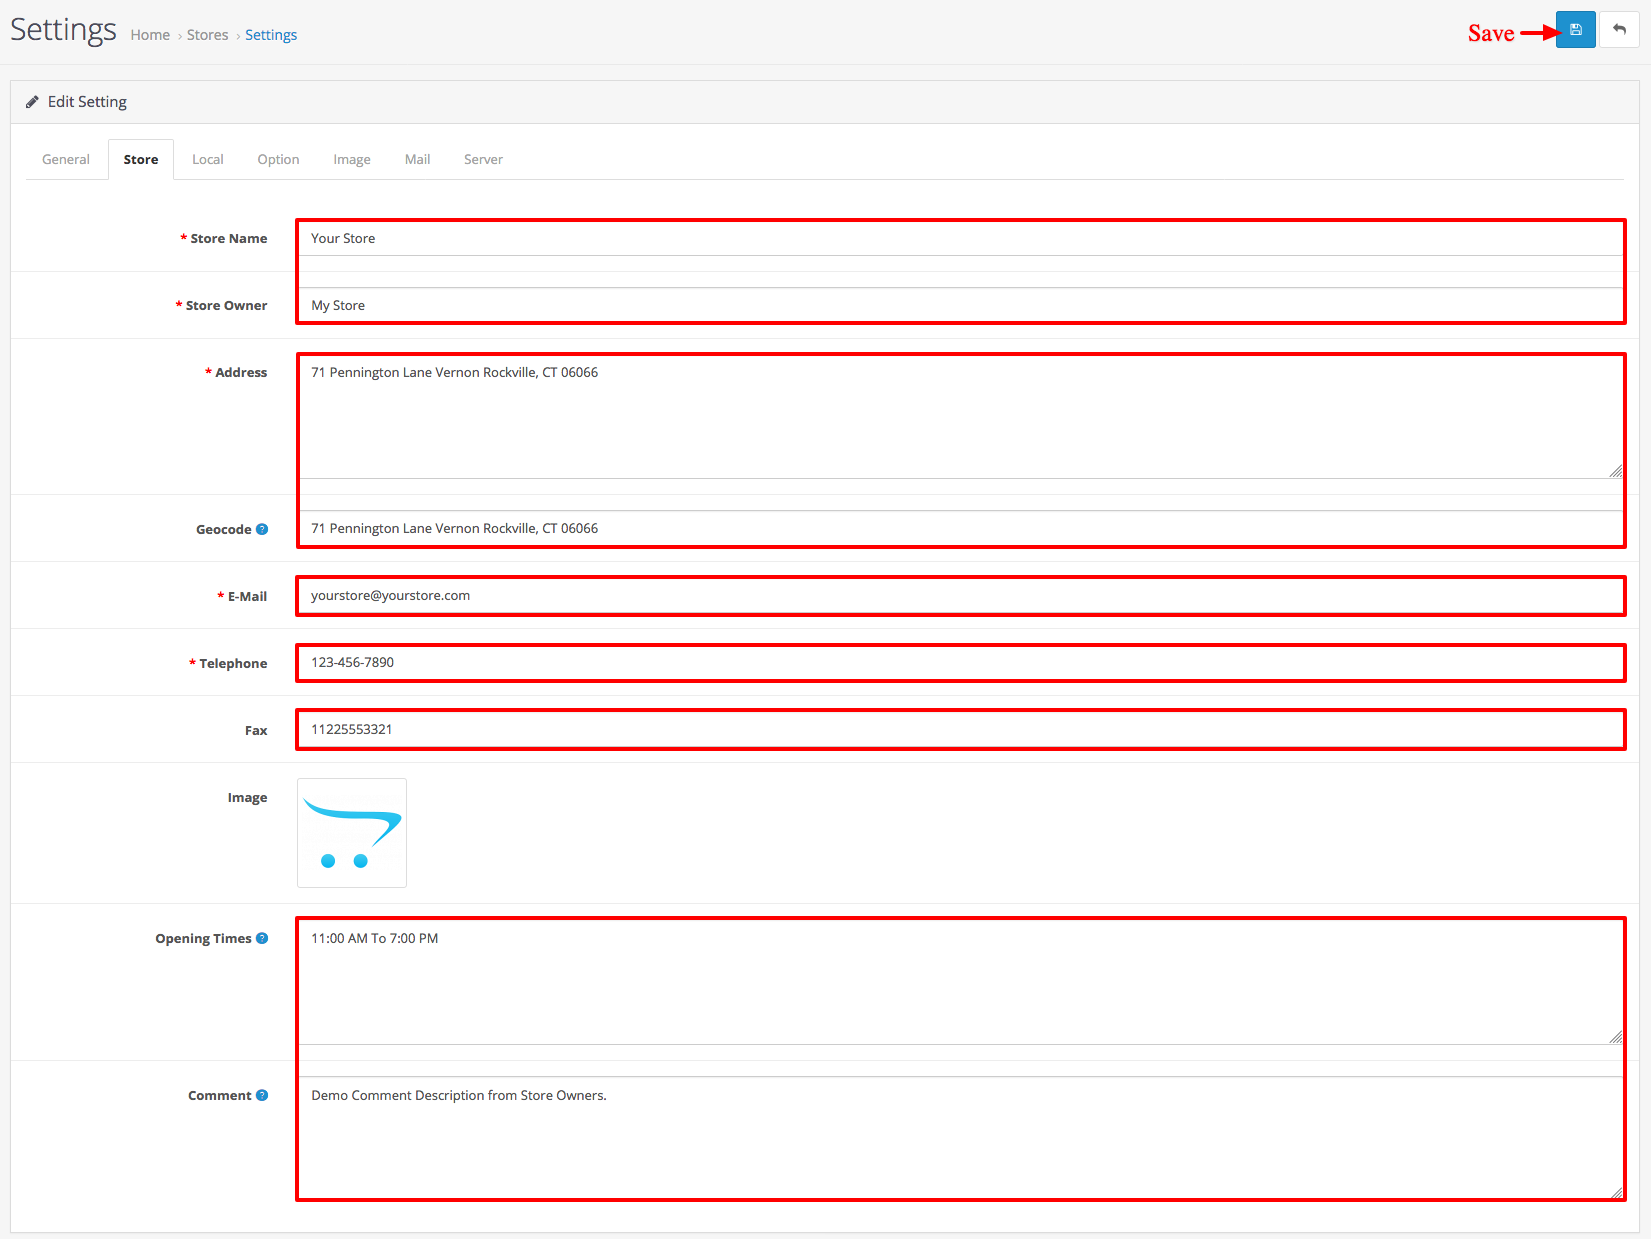
Goto Admin System > Setting > “ your store ” Edit > Store (Store tab).
tab then set Details About your themes of your site.
Select Store > Edit
Select Store tab
Store Name : Your Store
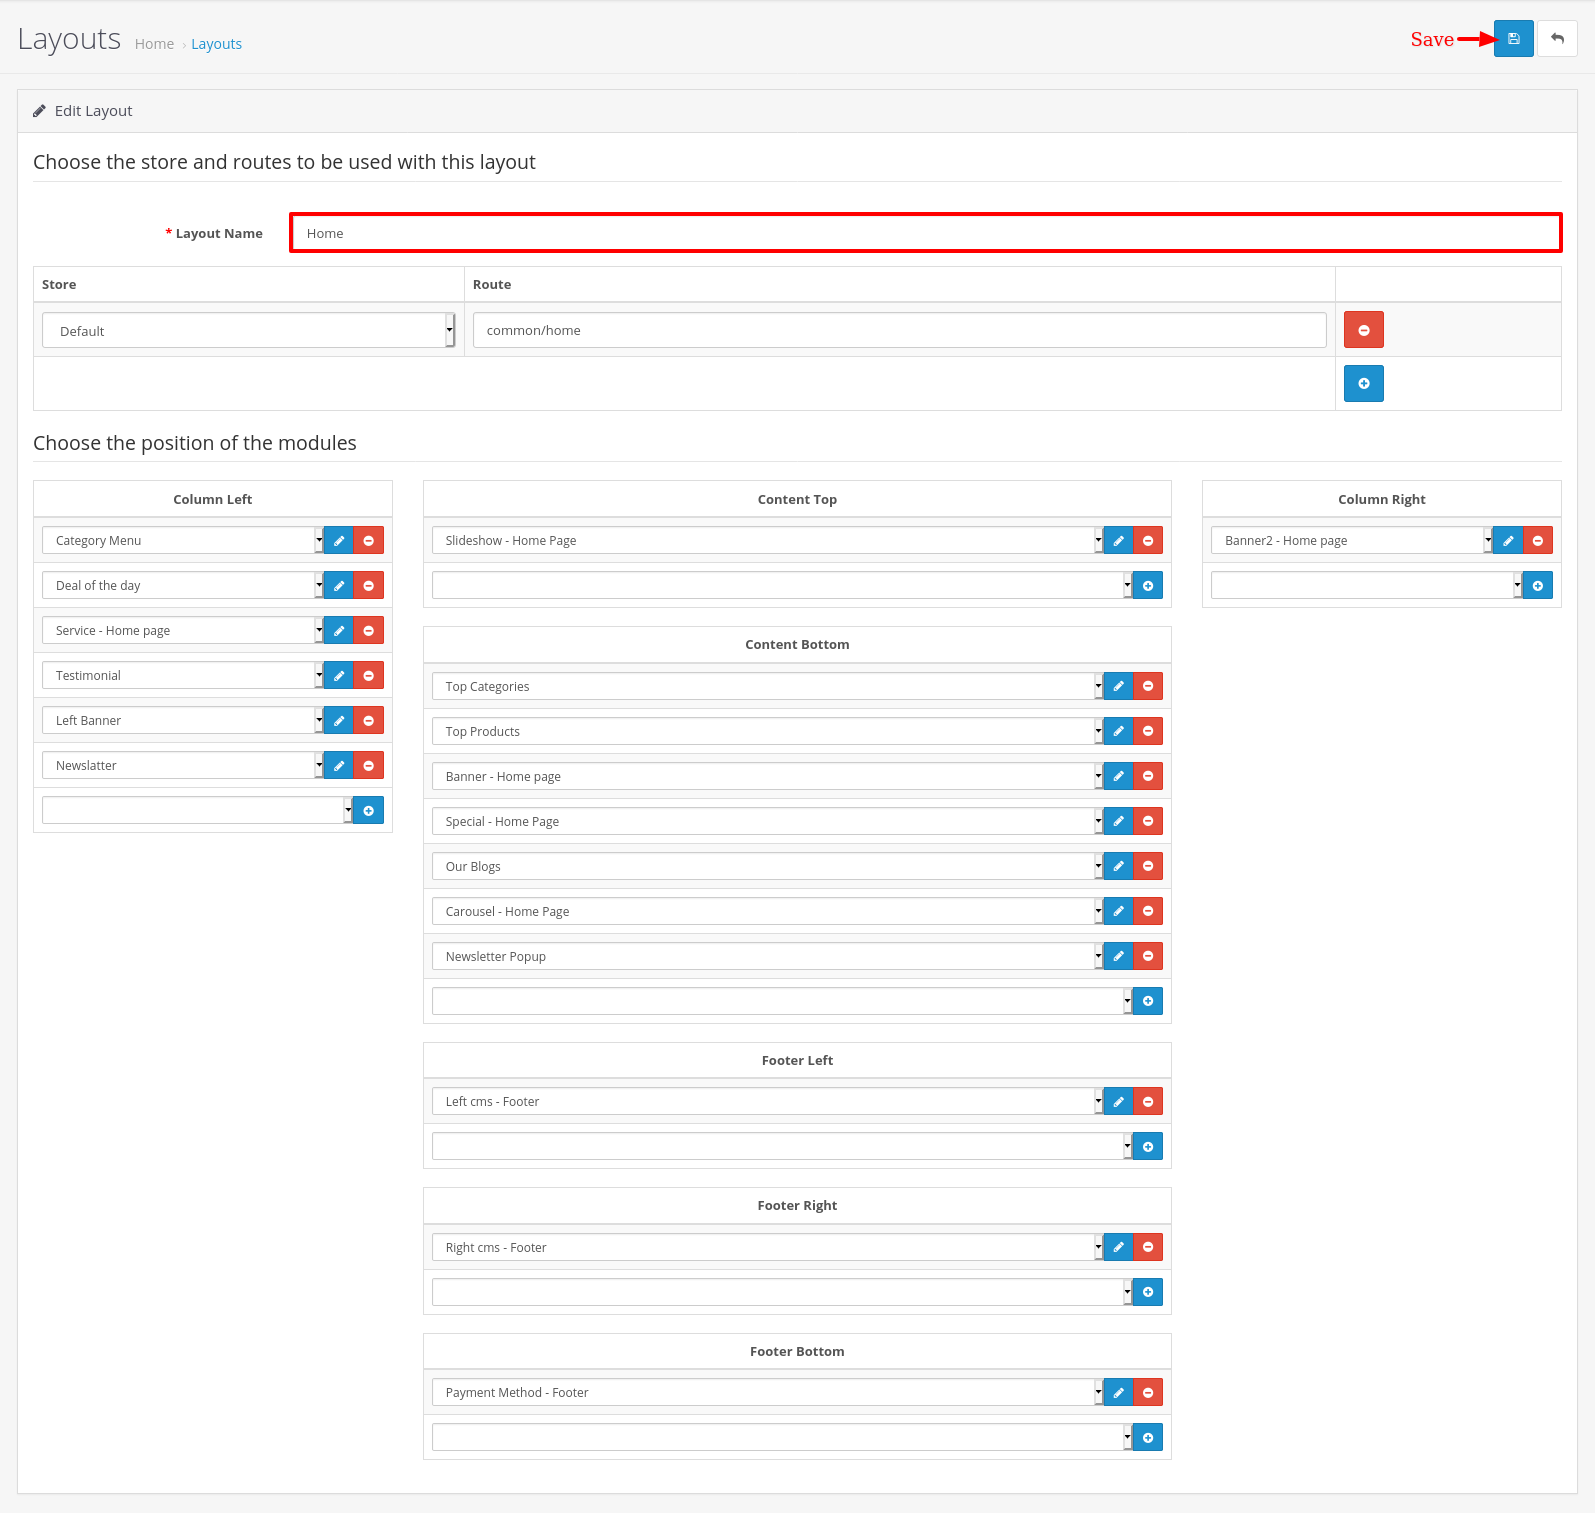
Layout setting Click on Home layout Edit link.
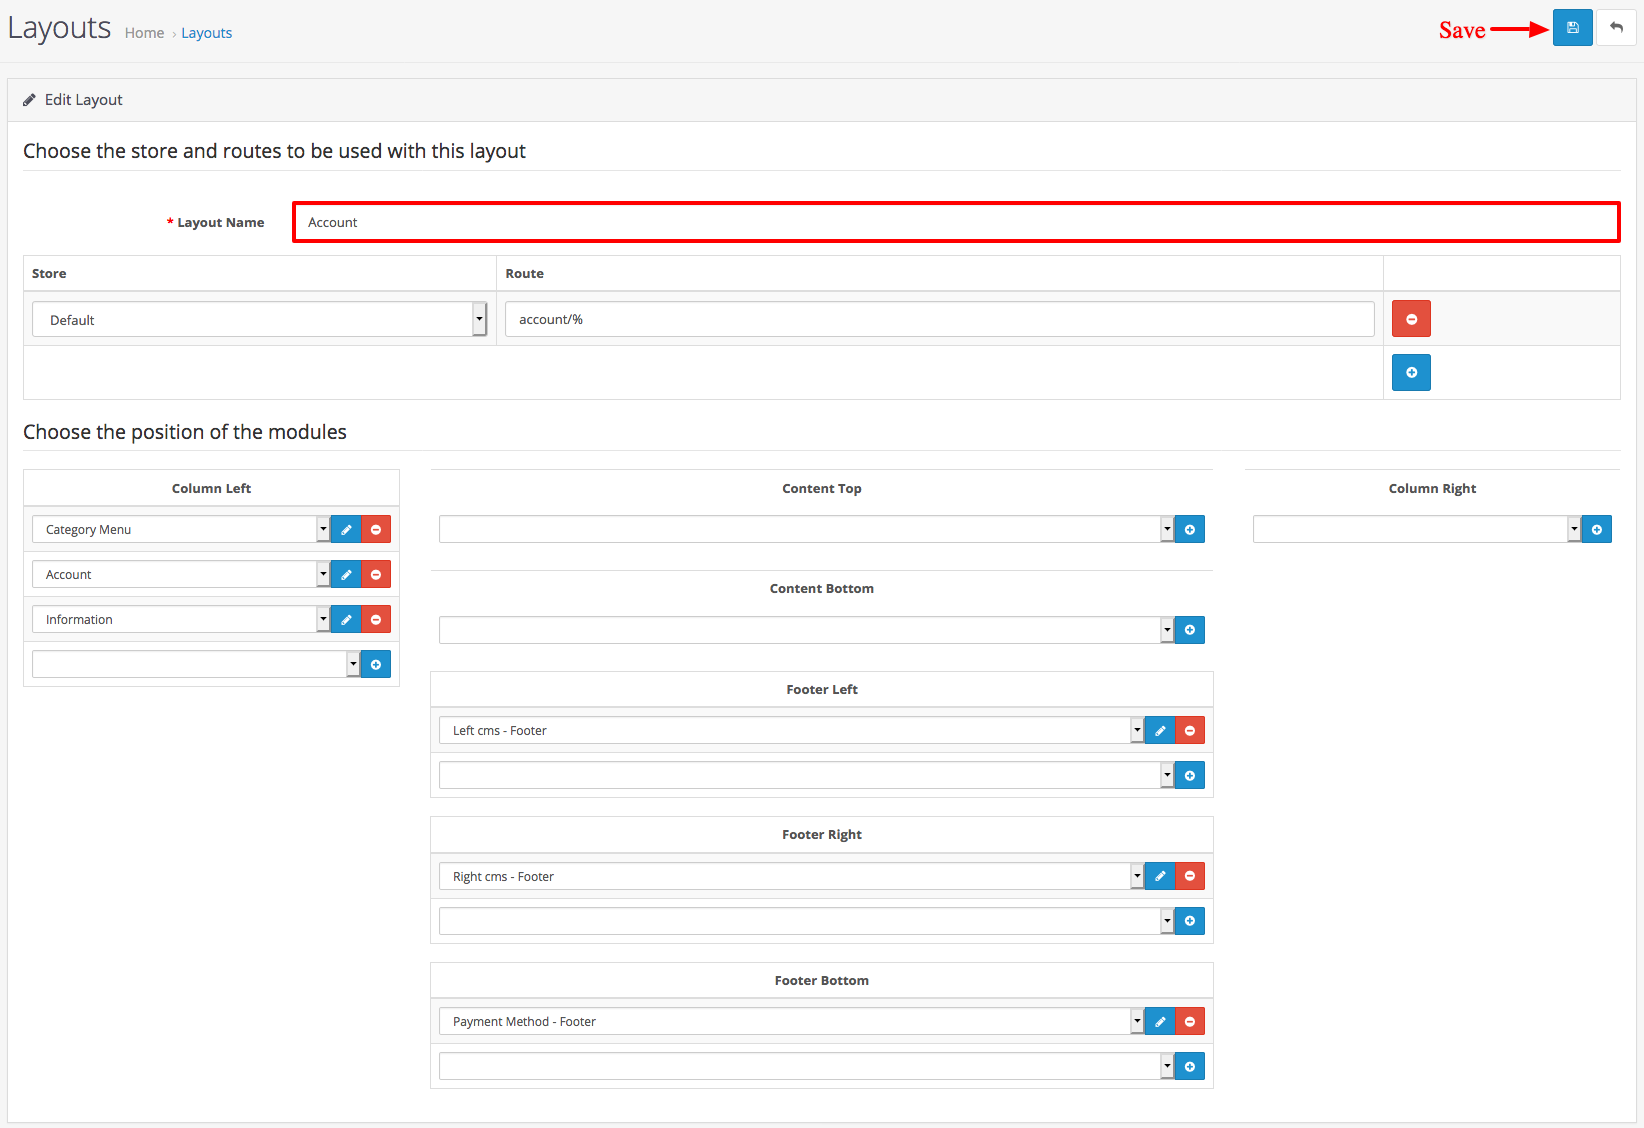
Layout setting Click on Account layout Edit link.
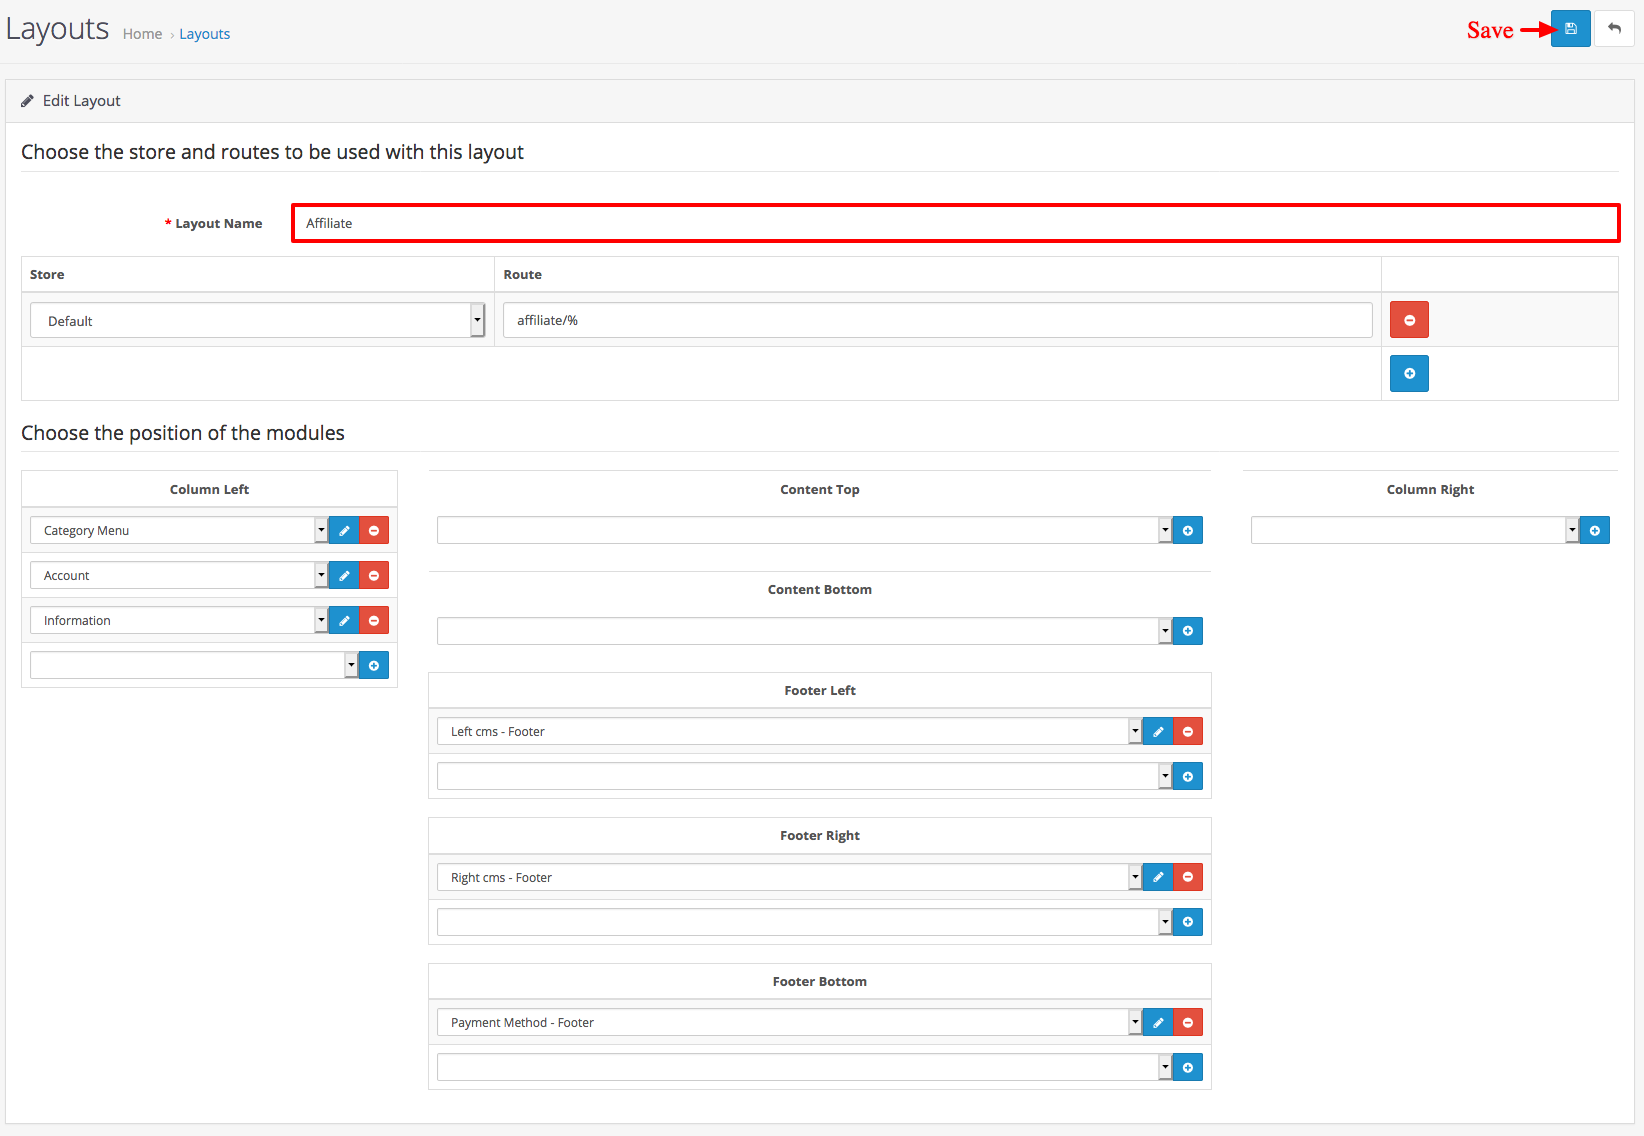
Layout setting Click on Affiliate layout Edit link.
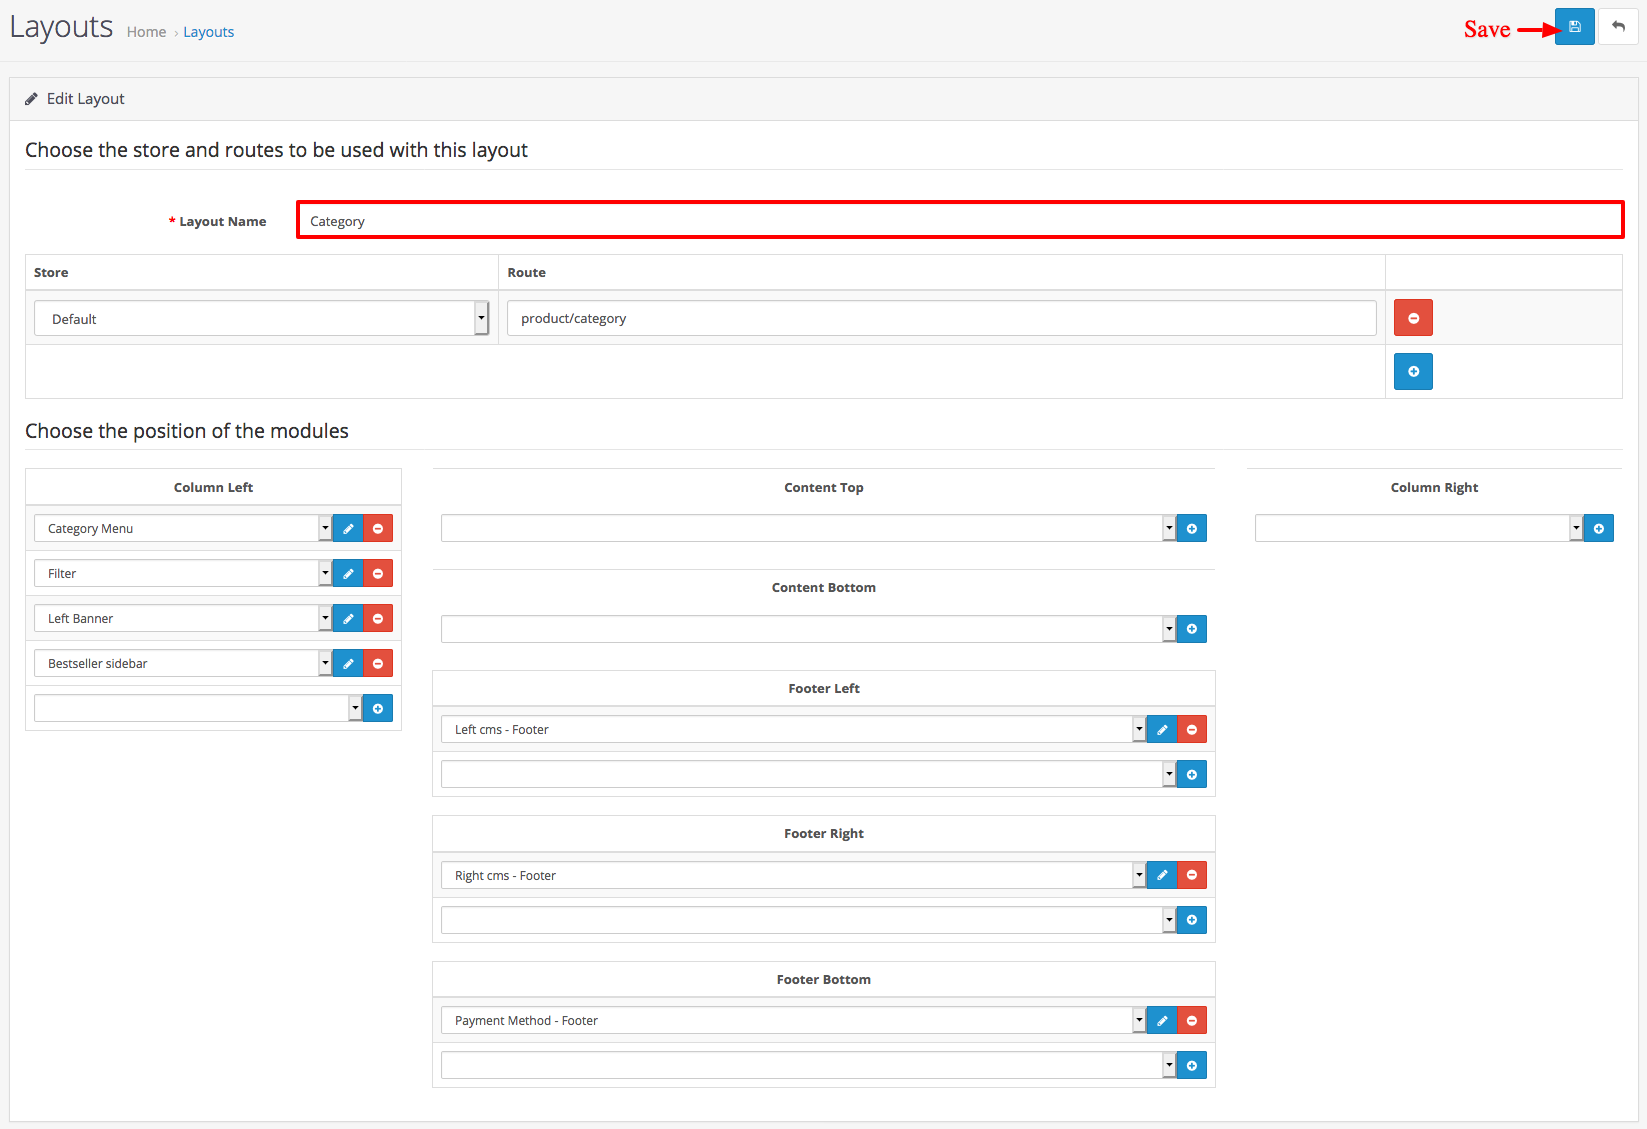
Layout setting Click on Category layout Edit link.
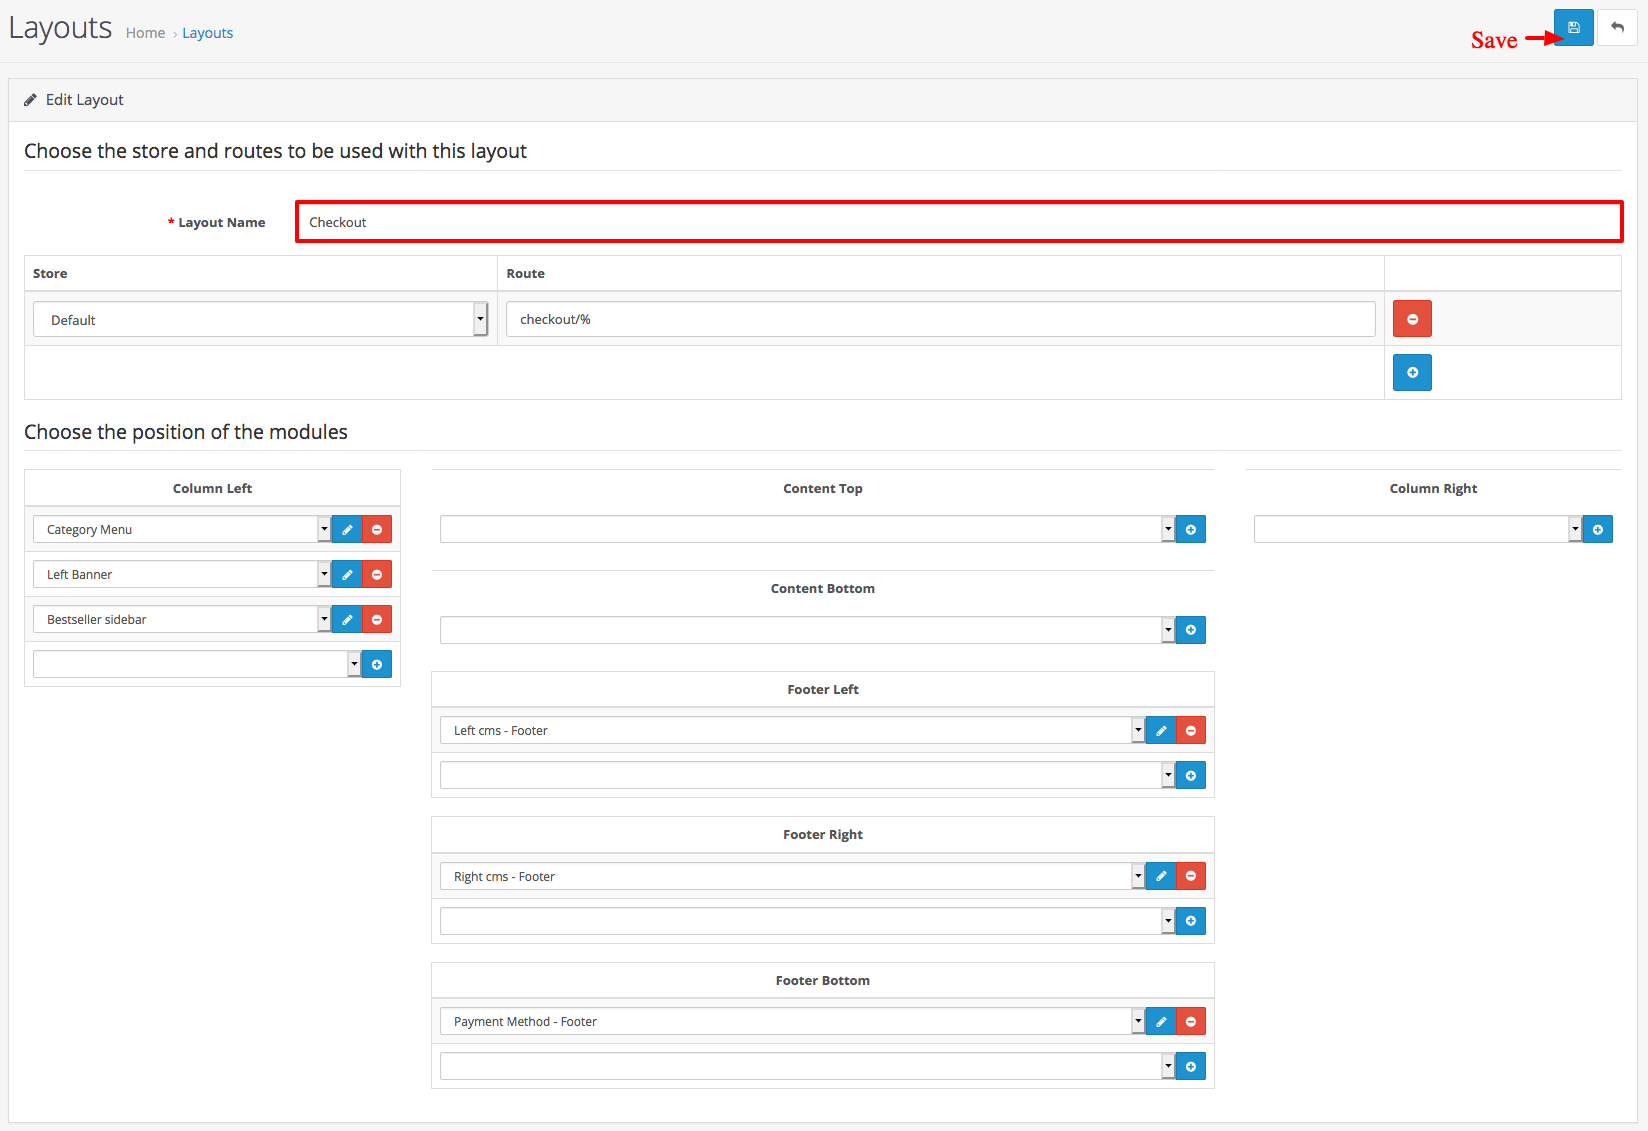
Layout setting Click on Checkout layout Edit link.
Layout setting Click on Compare layout Edit link.

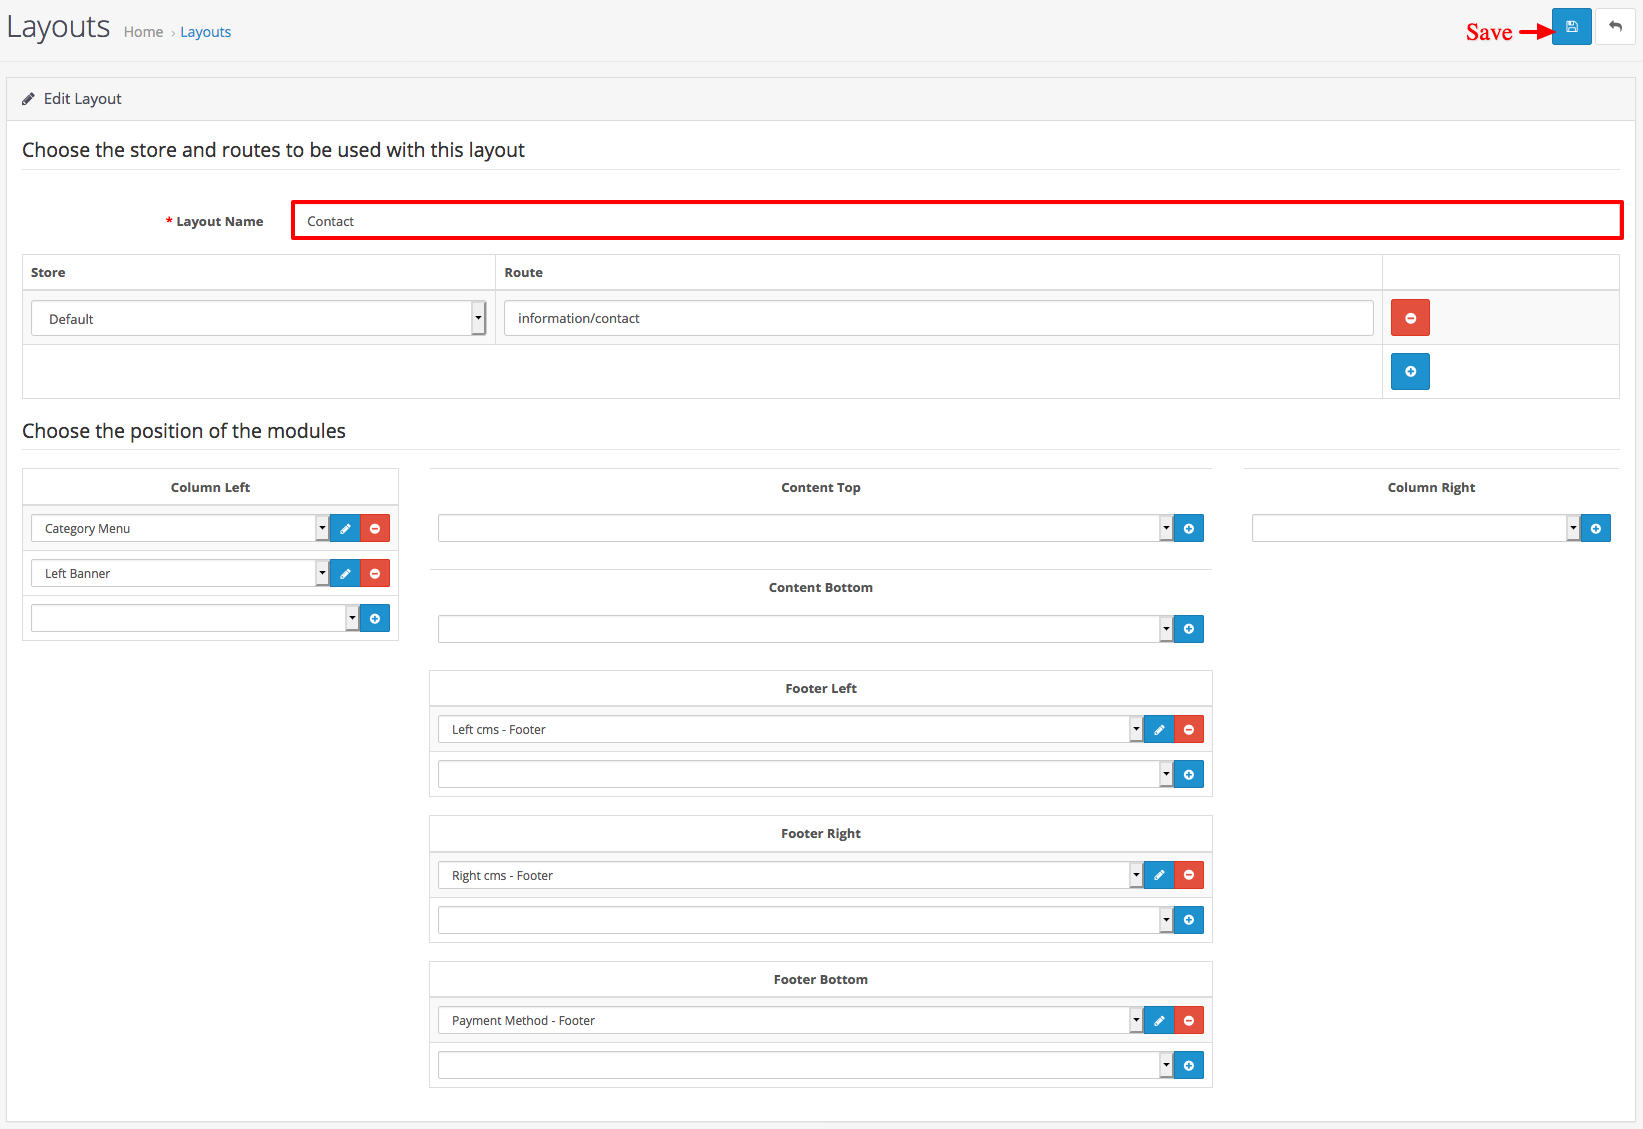
Layout setting Click on Contact layout Edit link.
Layout setting Click on Default layout Edit link.

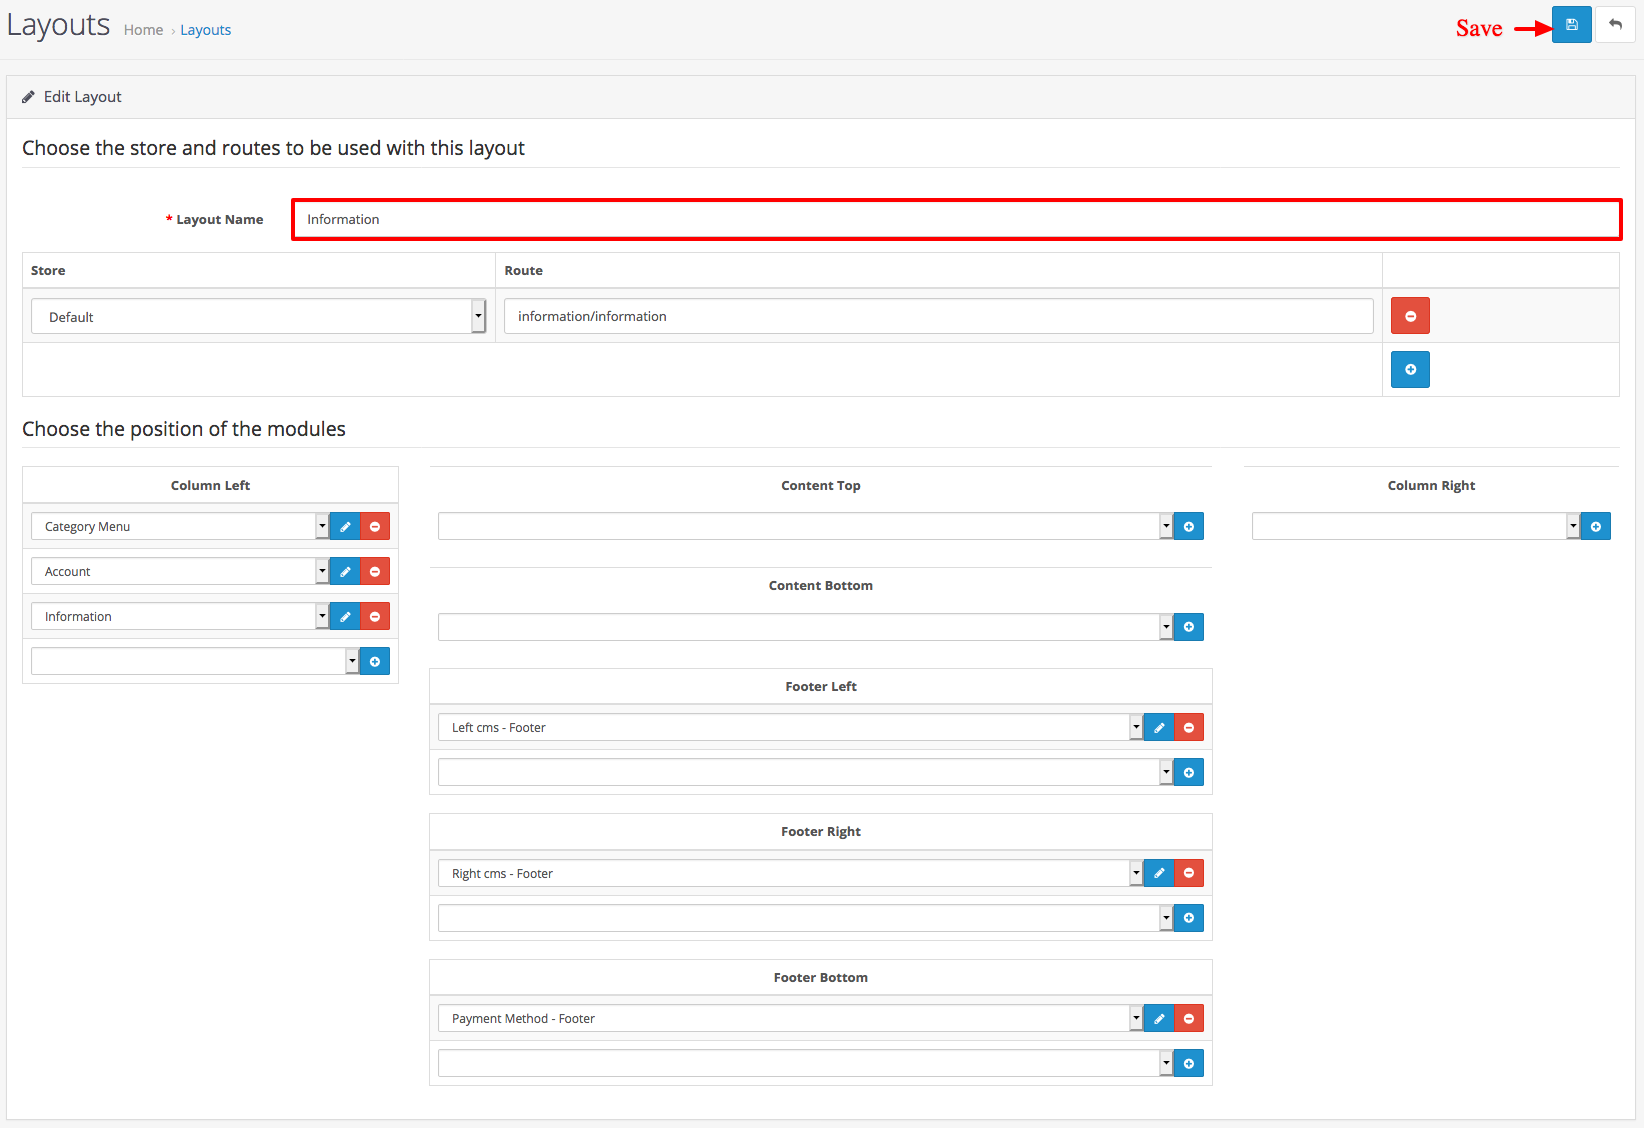
Layout setting Click on Information layout Edit link.
Layout setting Click on Manufacture layout Edit link.

Layout setting Click on Product layout Edit link.

Layout setting Click on Search layout Edit link.

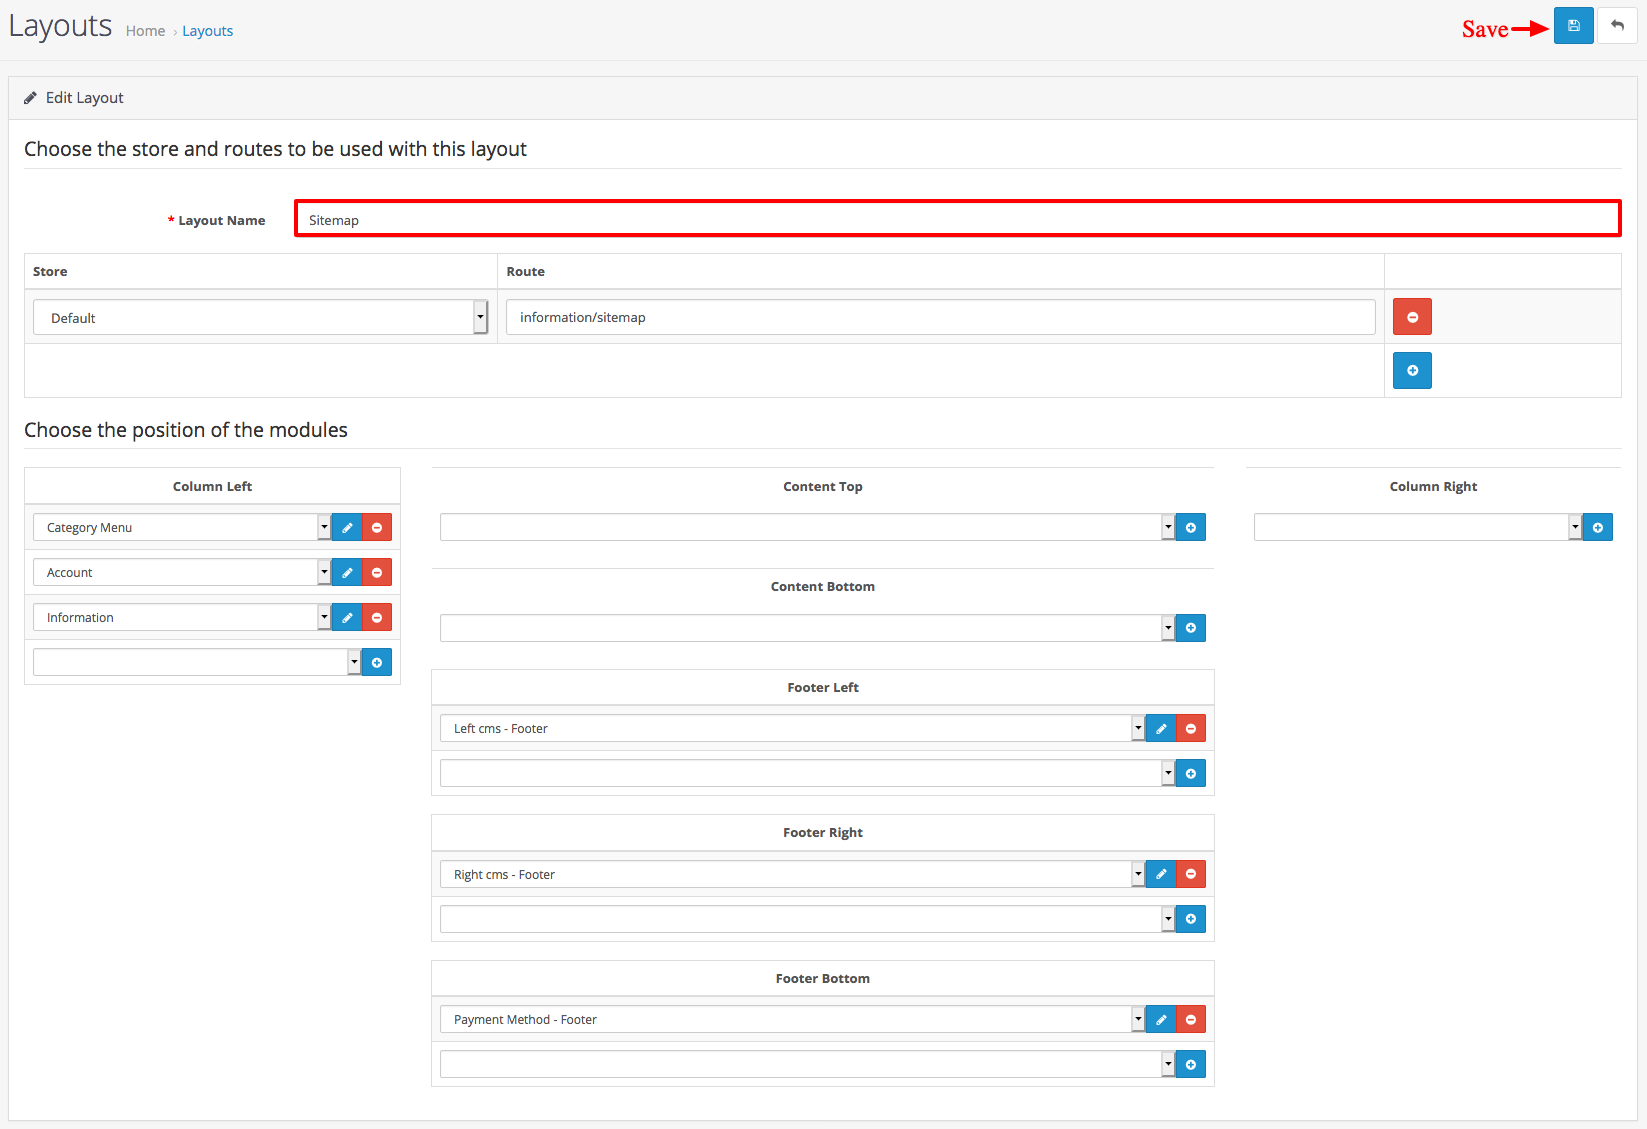
Layout setting Click on Sitemap layout Edit link.